Announcement

Collapse
No announcement yet.

Setting up and using Radiant

Collapse
This is a sticky topic.
X
X
 
  • Filter
  • Time
  • Show
Clear All
new posts

  • Setting up and using Radiant

    Radiant is the map editor typically used for games like Quake 3, Doom 3 and so forth. It can be used to make Quake 1 maps, too.

    There is a little myth saying that Radiant is hard to use or setup; that it is too complex. That's wrong. It's no more complex than other map editors. The entry barrier might be a bit higher, because it relies a lot on keyboard shortcuts (in this regard, it is similar to Quest) and for Quake 1, there are editors that are easier to install. Baker's Worldcraft/Quake adapter comes to mind.

    However, Worldcraft is not the atom bomb of mapping; that title would probably have to go to Radiant, seeing the number of games it supports and the amount of maps that have been made using it. Also, when was the last time Worldcraft showed you external models inside the map view? Hmm?
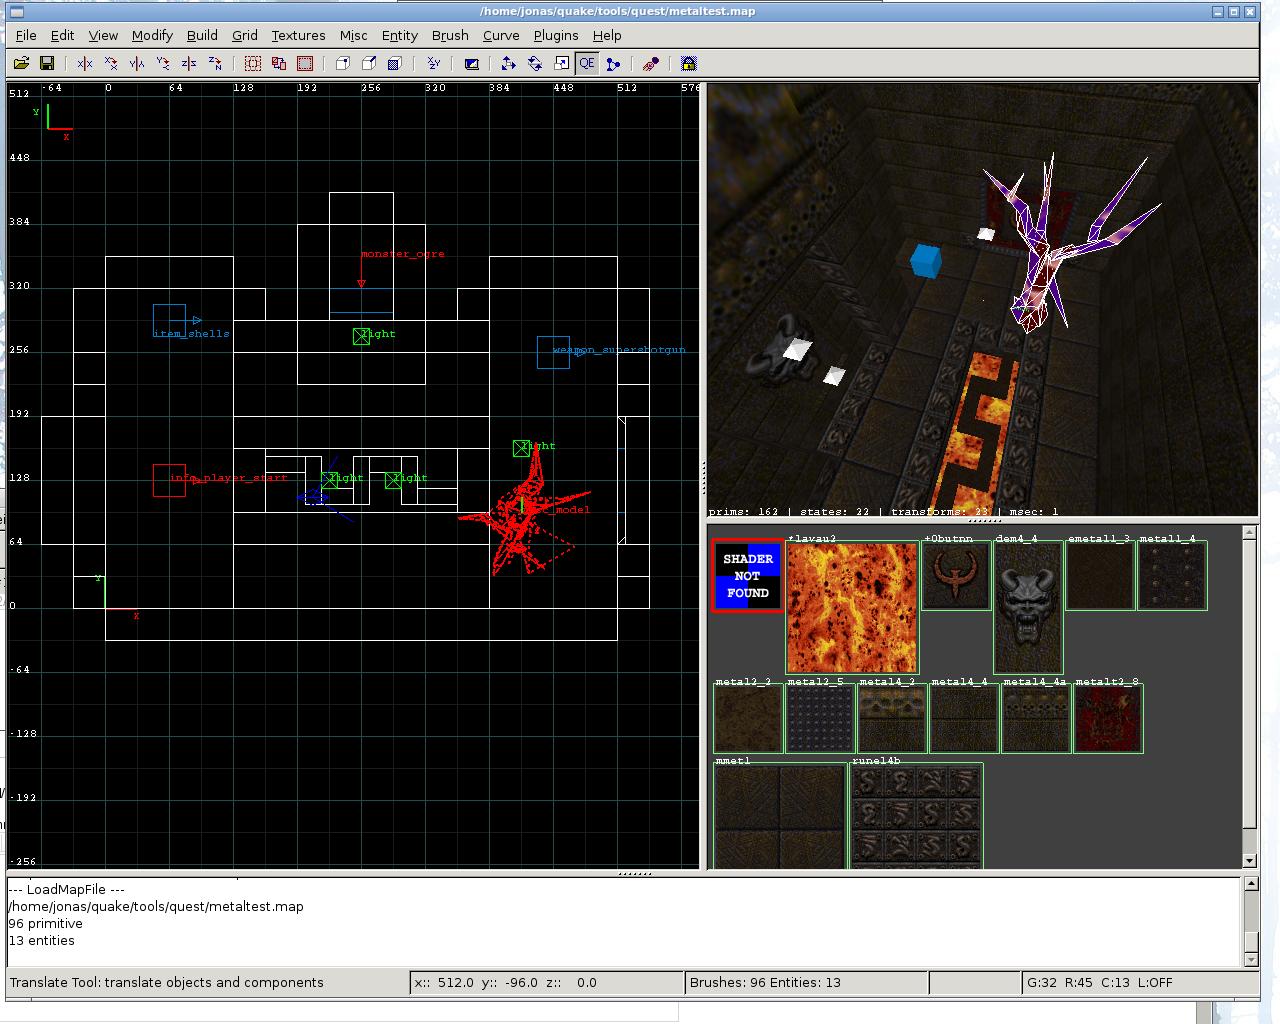


    In short, if making Quake maps is all you ever fancy, go use Worldcraft and be happy. But if you have a somewhat deeper interest in level design, and can imagine maybe mapping for other games one day, you should install and learn Radiant. It is a standard. And the only way to learn an editor is by using it.

    Since I'm geeky enough to make maps in the first place, using Linux isn't that far off; hence, I'll show you how to install and use Radiant under Linux. I believe that you can gather a couple things from this if you use Windows, too.

    1. Installing GTKRadiant 1.5

    First off, there are some variants of Radiant; like NetRadiant. I will go with straight GTKRadiant 1.5 here.

    Install GTKradiant using your distro's package manager. Windows users go here:

    qeradiant.com

    Install GTKRadiant 1.5. Don't forget to install the Quake 1 gamepack! To make sure you have the Quake 1 gamepack, go into your freshly installed GTKRadiant folder and check for a subdirectory called q1.game. The directory structure should look like this (example from Linux, should be similar for Windows users):

    gtkradiant/
    gtkradiant/q1.game/
    gtkradiant/q1.game/default_build_menu.xml
    gtkradiant/q1.game/id1/
    gtkradiant/q1.game/id1/entities.ent

    There must also exist a text file called

    gtkradiant/games/q1.game

    If you have that stuff, then the Quake 1 gamepack is installed.

    2. Making Radiant see the textures

    Many people have the problem that when they open Radiant, it doesn't find the textures. Here is the solution: The texture wad files must be located inside the id1 folder.

    Download the Quake textures, or any others you want to use, for example here:

    Quaddicted.com: Quake Texture Wad Archive

    Put any .wad files into quake/id1, or symlink them there if you know how to do that. It should look like this:

    Quake/id1/Quake.wad
    Quake/id1/my_textures.wad

    This should solve the textures issue.

    3. Setting the engine path / game path

    Radiant needs to know where your Quake directory (folder) is in order to find the pakfiles and so on. There are a couple ways to do this. You can either open this file

    gtkradiant/games/q1.game

    in a text editor (notepad) and set this stuff correctly:

    enginepath_linux="/home/jonas/quake/"
    enginepath_win32="c:/quake/"
    engine_win32="quake.exe"

    or you can set that in the editor by pressing the P key (preferences) and looking for Settings / Path and enter the correct Engine Path.

    4. Mapping for Mods (Quoth, RMQ, etc.)

    If you want to use Quoth, for example, or any other mod like that, you need an entity definition file. Radiant, unlike Worldcraft (which uses .fgd), uses .def files. So find a Quoth .def file, or a RemakeQuake .def file, or whatever mod you want to map for. Here are some:

    http://www.quaketastic.com/upload/fi...sc/gb_defs.zip

    Then, go to the q1.game folder I showed you. Inside that, create a new folder for your mod. Call this new folder the same as the mod's game directory.

    For example, if your Quoth folder is:

    /Quake/quoth/

    then for GTKRadiant, create a folder called

    /gtkradiant/q1.game/quoth/

    and put your .def file into that, so you have

    /gtkradiant/q1.game/quoth/quoth.def

    Was that hard?

    There is one more thing to do, though. GTKRadiant 1.5 is configured to use the XML format for entity definition files. The one for standard Quake is already installed:

    gtkradiant/q1.game/id1/entities.ent

    That's an XML file, but Quake mods usually provide .def files that aren't in XML. The solution: Tell GTKRadiant to use the def format for entity definition files, not XML. Open the file

    /gtkradiant/games/q1.game

    in a text editor (notepad). Change

    entityclasstype="xml"

    to

    entityclasstype="def".

    This will make it read the usual .def files.

    5. Selecting your game or mod inside Radiant.

    Fire up Radiant. Go to File / Project Settings. In the box that pops up, choose the game, or the mod, you want to map for. In case you're mapping for vanilla Quake, choose "Quake". Duh. But if you want to map for Quoth, and you have the Quoth .def file installed like I showed you, then select "Custom Quake modification". In the text field below, called fs_game, enter the name of the mod folder (gamedir) you created earlier! For example, "quoth" (without quotes).

    You can only select games that you have installed the gamepack for, and you can only select custom modifications that you have told Radiant how to use - ie you must have created that folder and inserted the .def file.

    Radiant should then load the pakfiles from id1/ as well as from the mod's gamedir, the .def file from the new folder you created, and the texture wad(s) from id1/.

    There is a console window in Radiant where you can see which files it tries to load, and also in the case of errors, what the problem is.

    When you right click into one of the editor's viewports, you should get a menu with all the entities of Quake, or of the mod you set up.

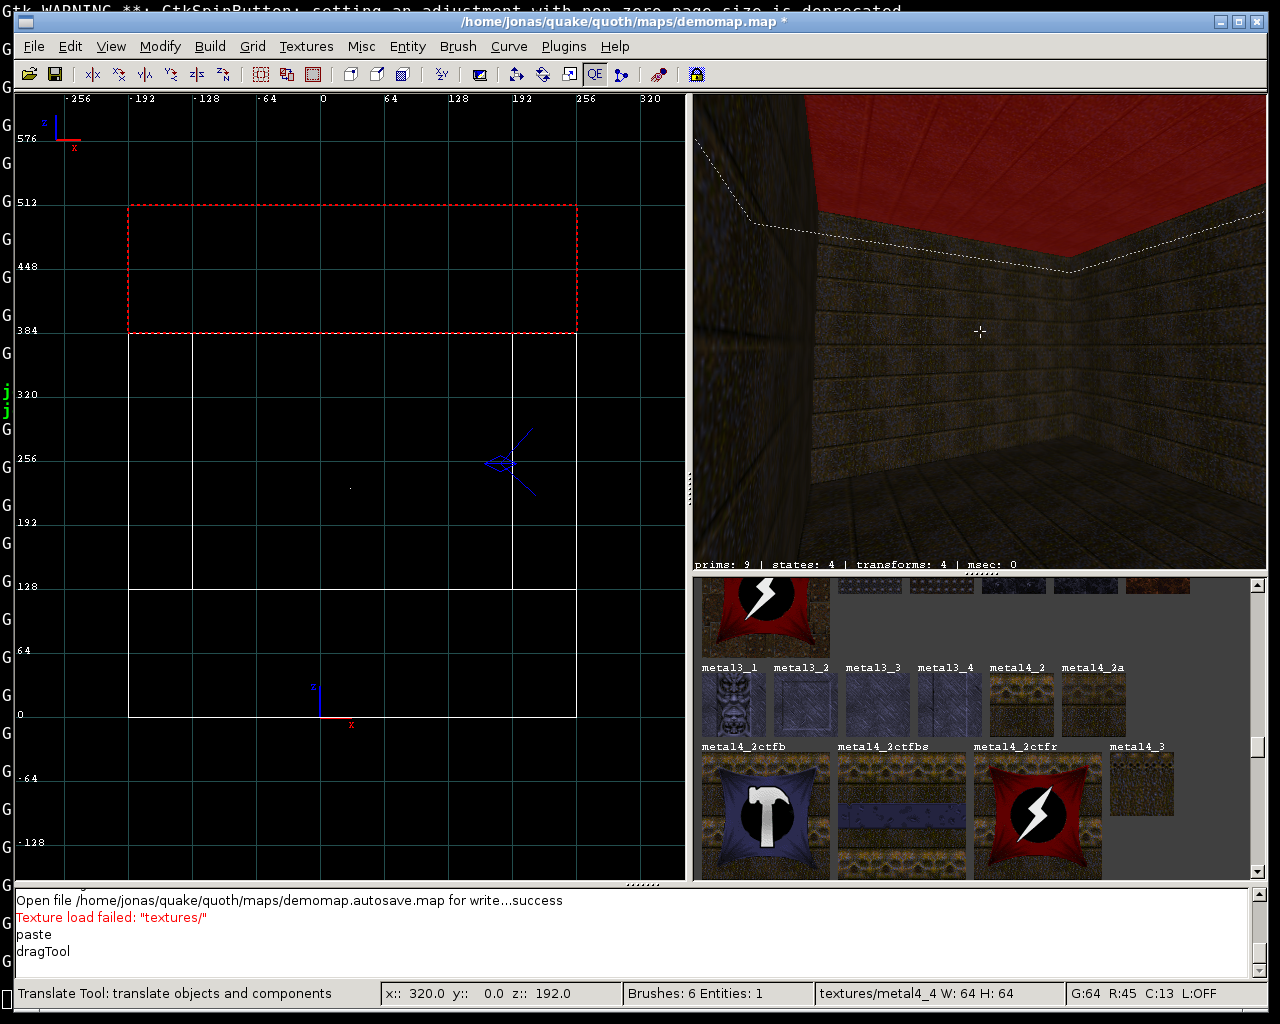
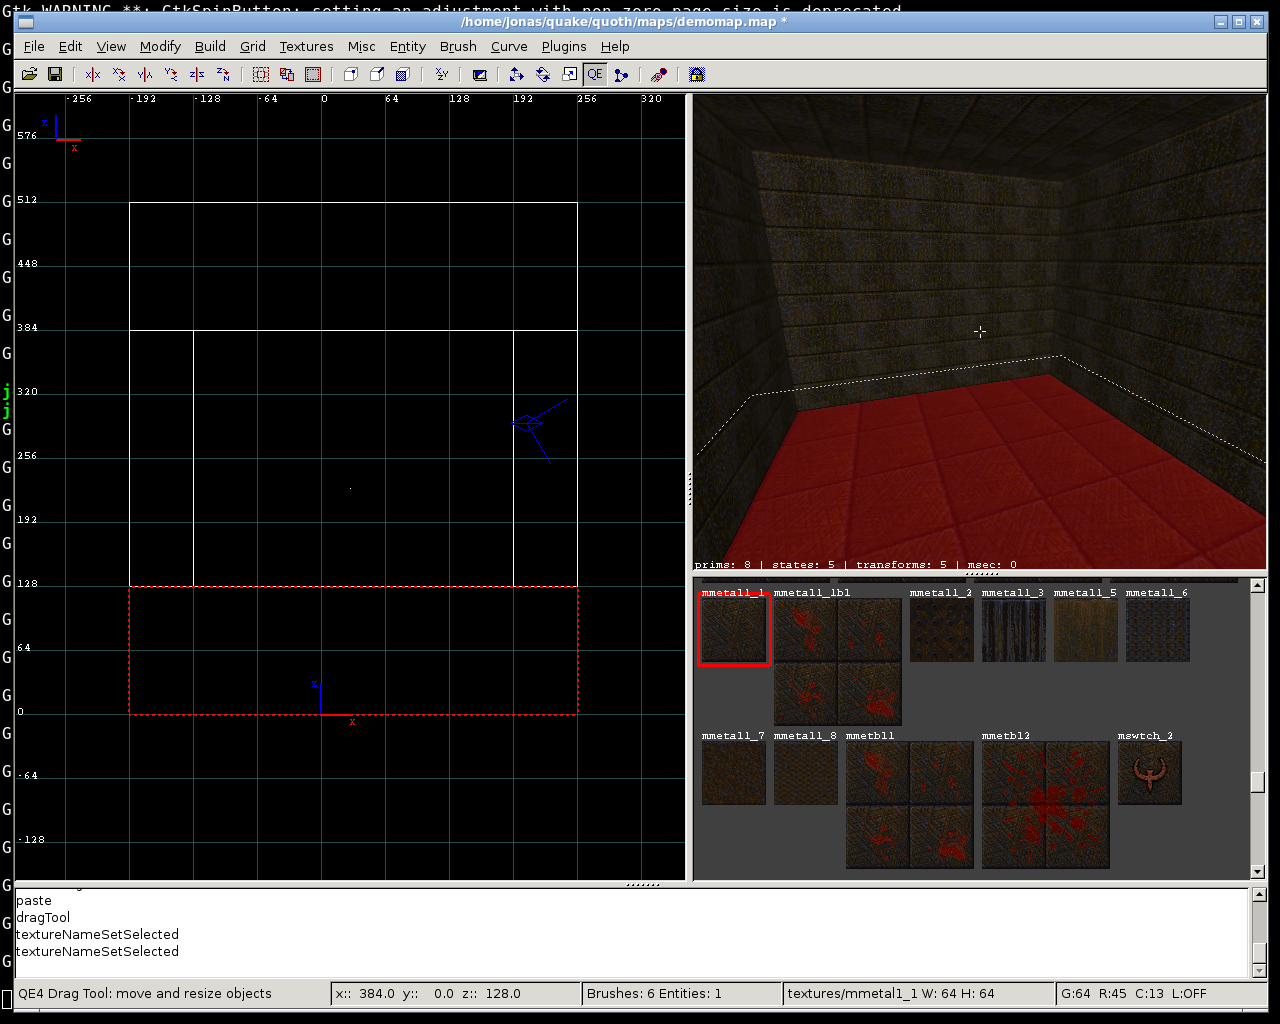
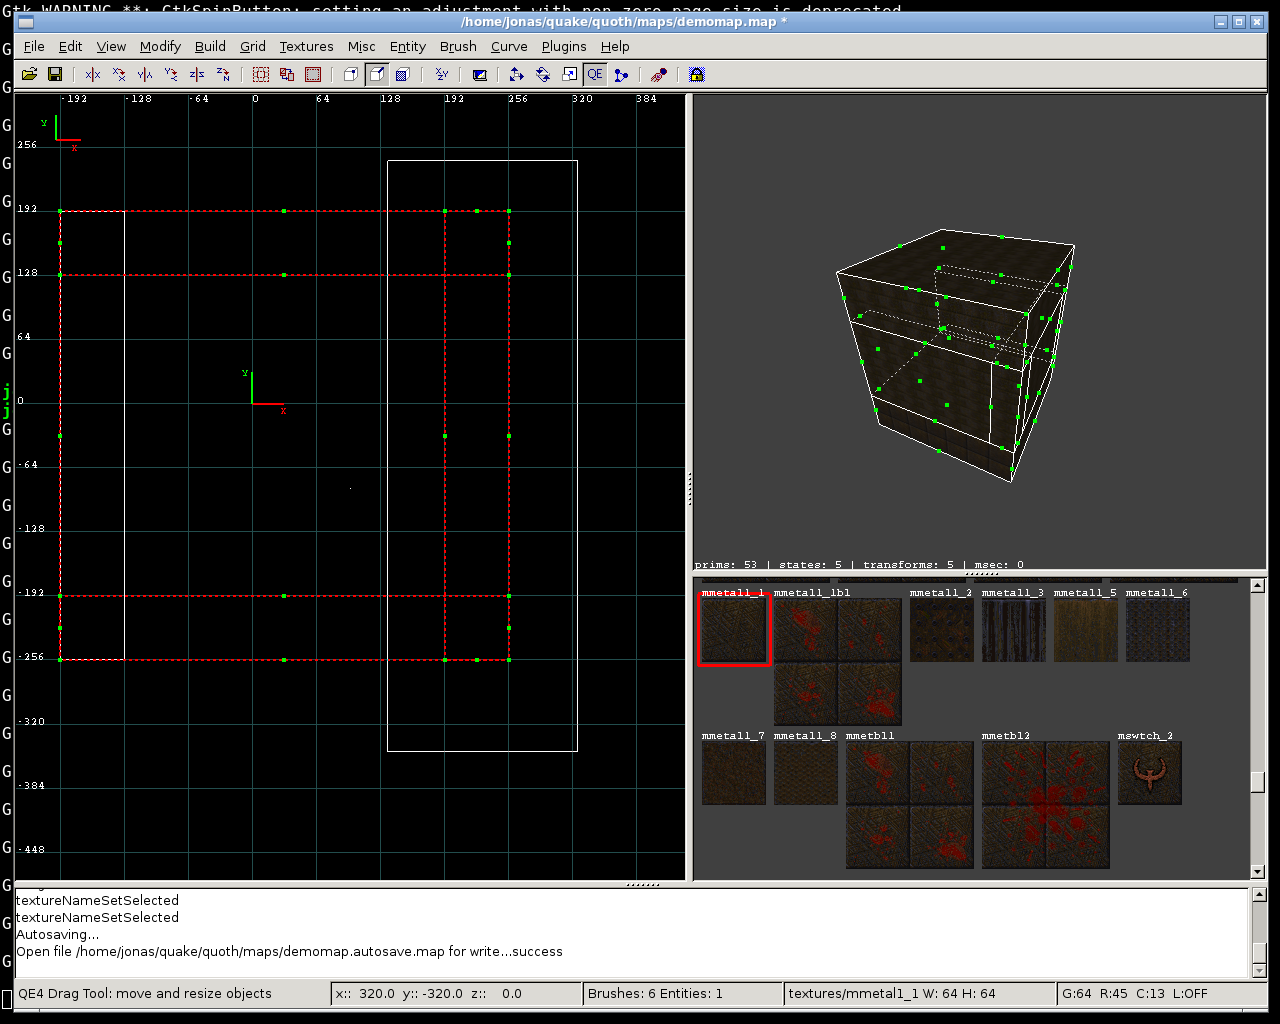
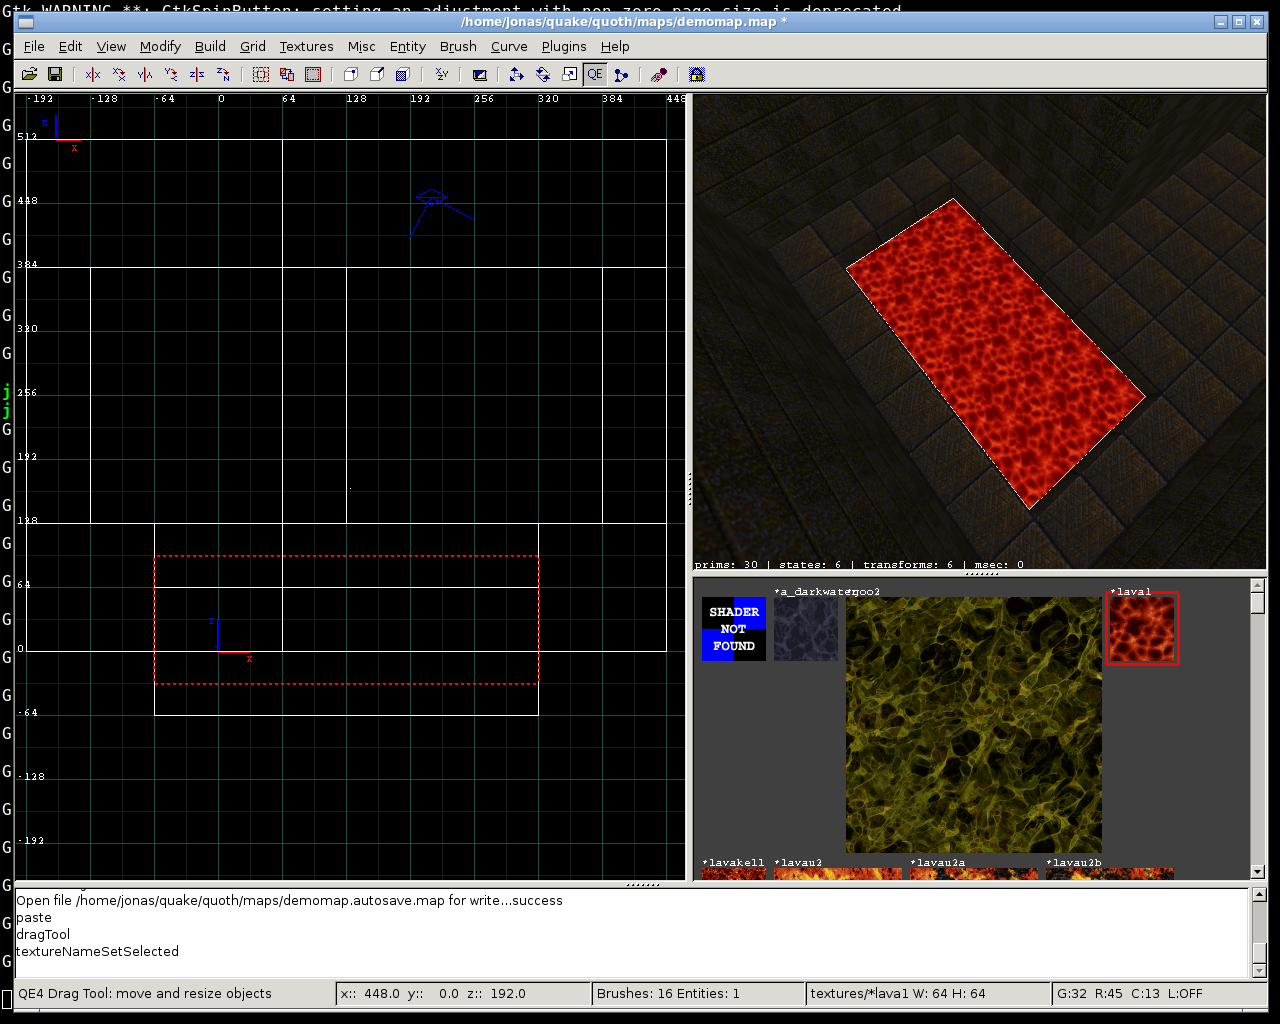
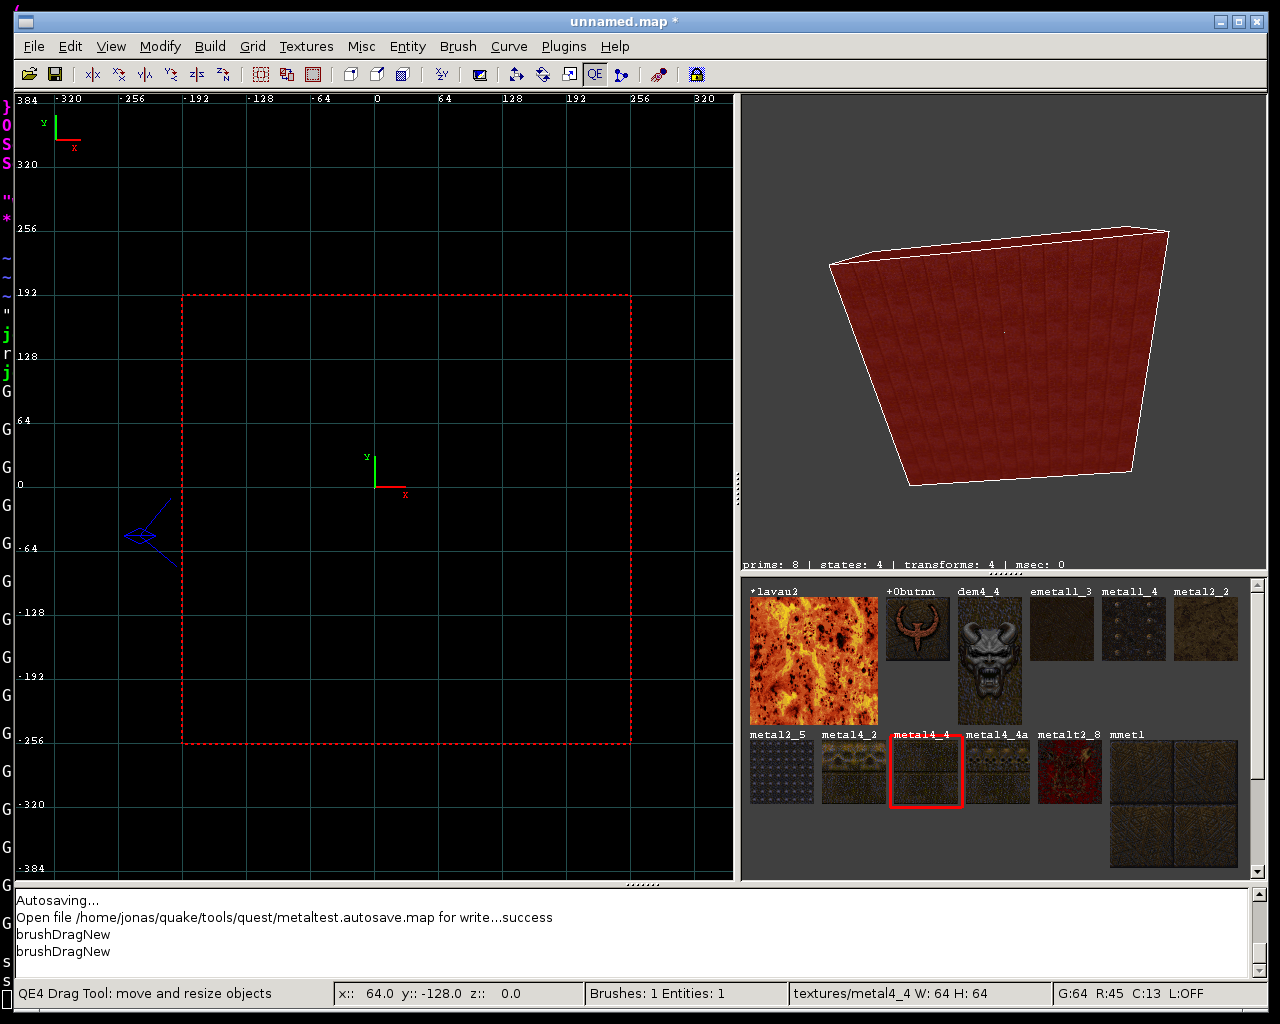
    Radiant lets you choose between several layouts and color schemes. In the picture at the beginning of this post, I use a setup with one 2-D viewport, one 3-D view, and a texture browser. The console is at the bottom. There are also layouts with four panels etc. and a lot of colors to choose from.

    Next up:

    Using the beast.
    Scout's Journey
    Rune of Earth Magic

  • #2
    Radiant Basics: Part 1

    Assuming you have set it up correctly, and right clicking into the viewport (window) with the grid gives you a popup menu with a list of Quake entities such as info_player_start, func_door and so on, and Quake's textures are displayed in the texture browser, then you are good to go!

    1. Click on File / New Map.

    2. Click on one of the wall textures in the texture browser. I recommend that grey metal wall texture from e1m6 and similar maps. The reason is that it's very easy to map with for a start. A red border will surround the active texture; this is the one that any new brushes will "wear".

    3. Go into the Grid menu and select Grid 64. This is a good size for some basic geometry, such as walls. It is also the size of most wall textures in Quake, which automatically means that they will usually be aligned correctly. You will later want to vary the grid size for building more delicate stuff, such as doors or buttons. Always, always stay "on the grid". Don't go around wildly rotating or scaling brushes, because that will mess things up. You want your stuff to align with the grid. For now. Like, know the rules before breaking them.

    4. Make sure the "QE" button is selected (shaded) in the toolbar. That means you're in Drag and Resize mode (QE4 Drag tool). You want this mode when creating and dragging around brushes.

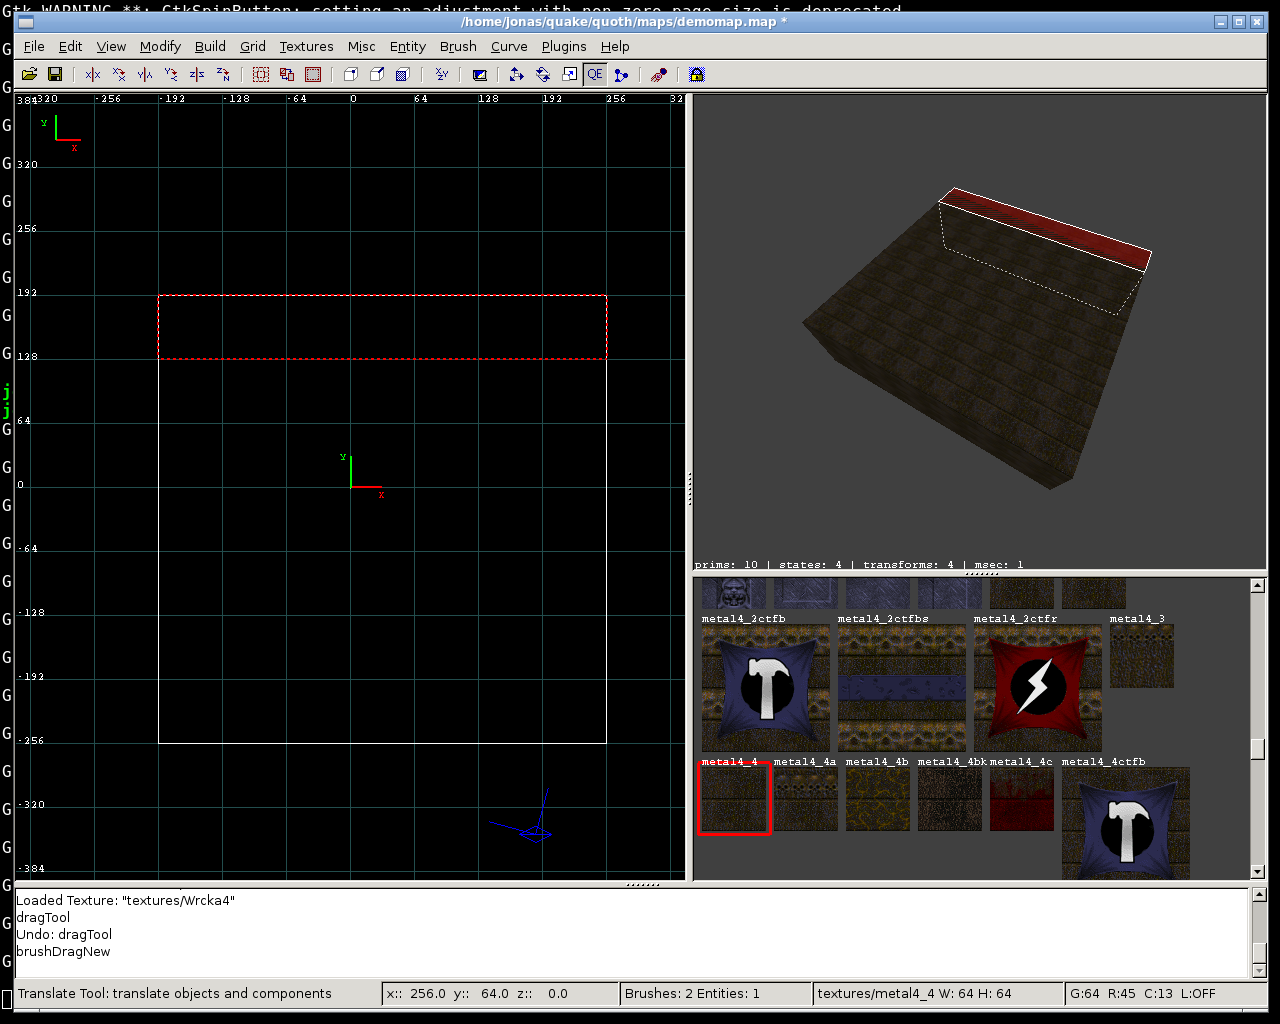
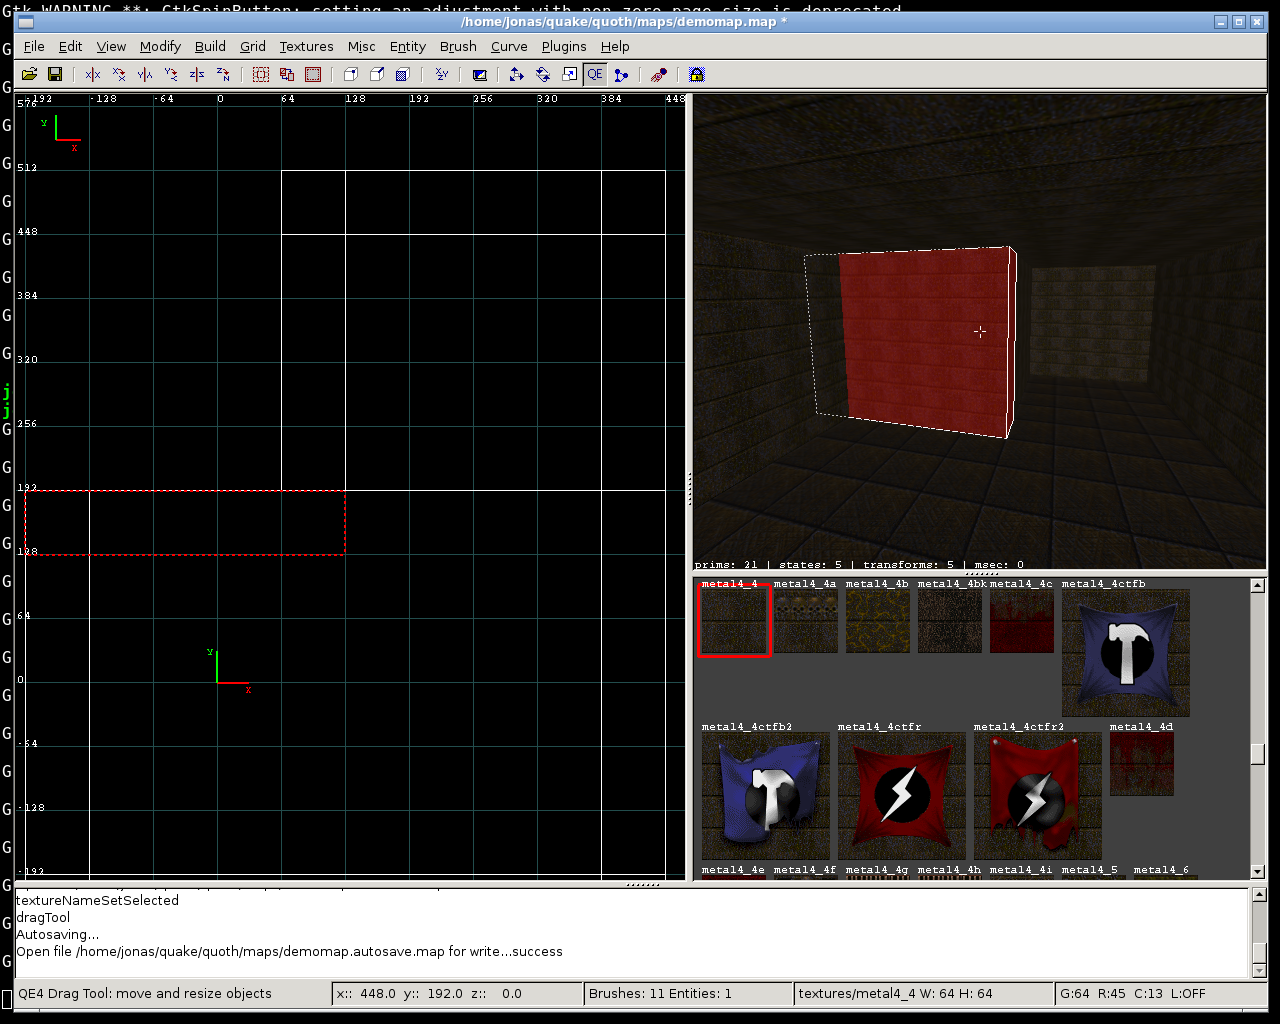
    5. Create a brush. This is easy; put the cursor somewhere in that viewport (window) that has an X / Y thing in the corner (that's the top view), click, and drag. When I say "click" I mean standard left click. Keep dragging for a bit.

    (Click and drag) creates brushes.

    This should make a dotted red rectangle like here:


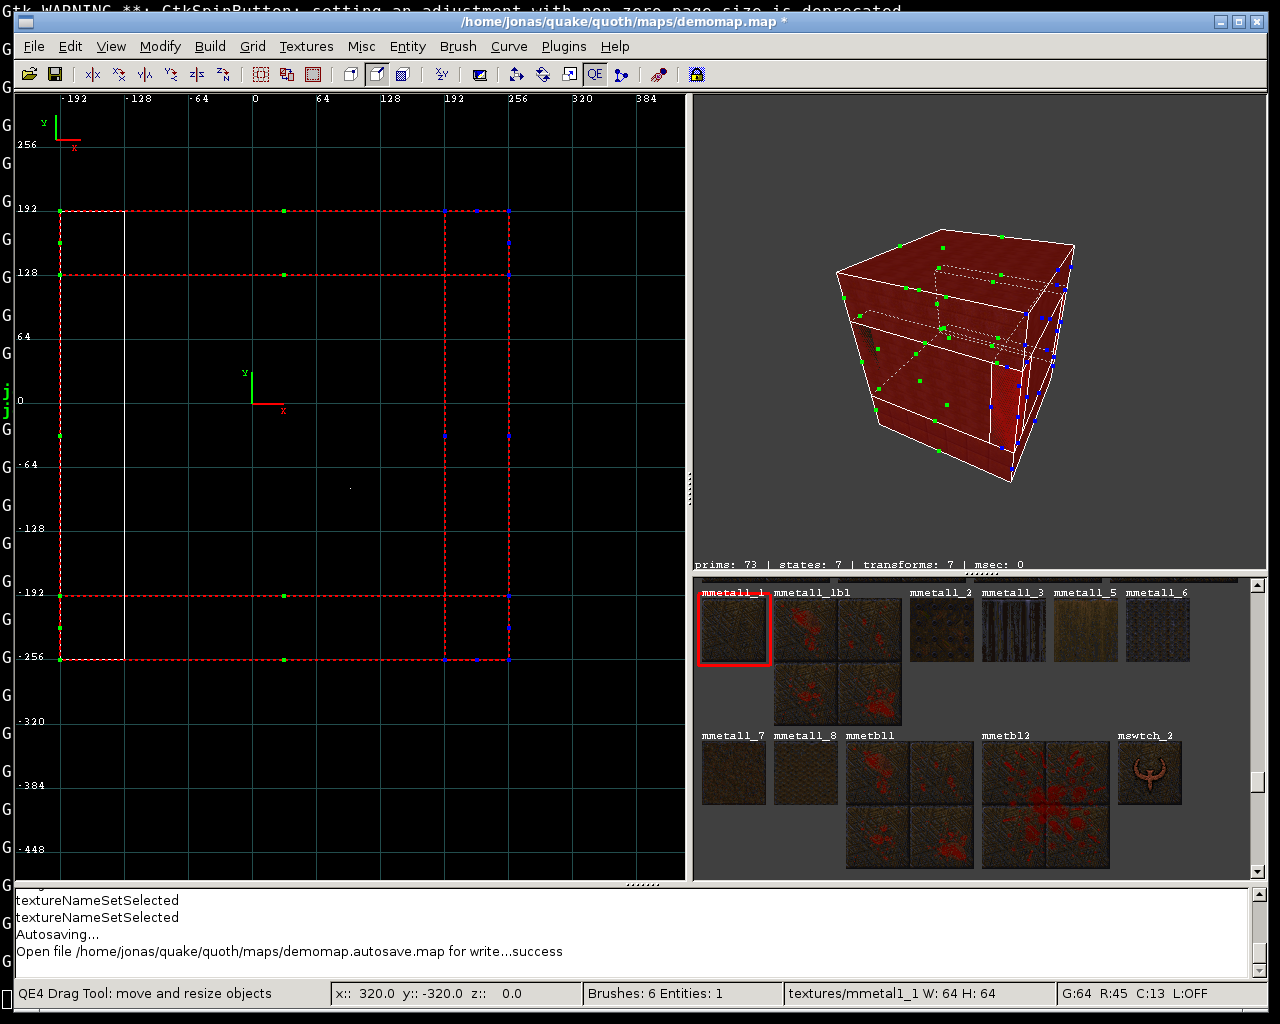
    That is the new brush. It should be covered in the texture you chose. The dotted line means that this brush is currently selected.

    (Shift - Click) selects stuff;
    (Esc) deselects stuff.

    If you don't like that new brush, delete it. That's easy, too:

    (Backspace) deletes stuff.

    Simply click and drag to make brushes. If you want to make smaller brushes, change the grid size.

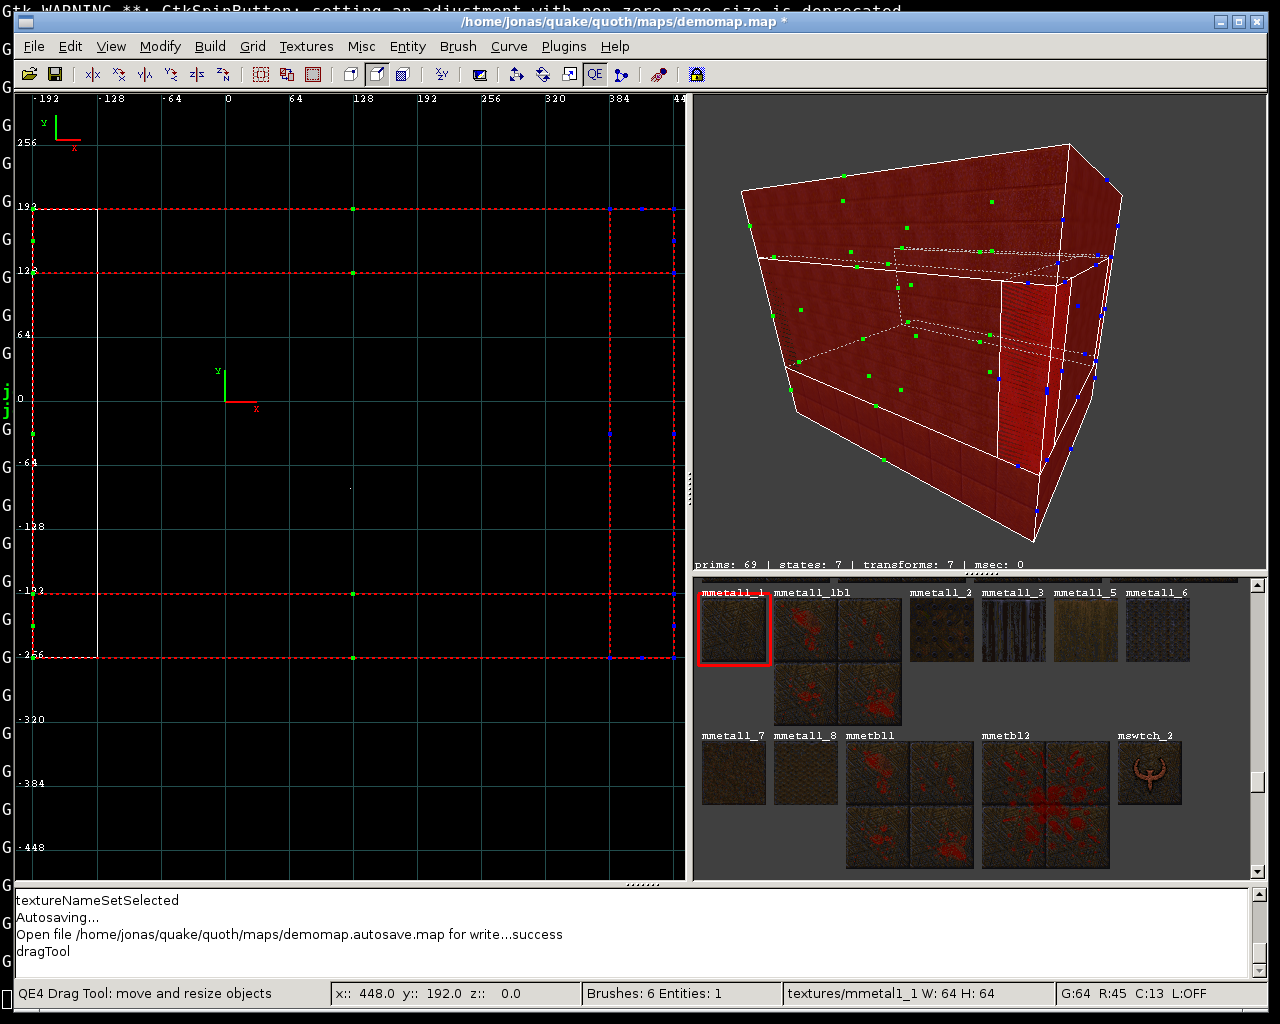
    Take a look at that picture... the 3-D viewport has the new brush, all textured, and... all red. The red means "selected".

    If you can't see anything in the 3-D viewport, you should pan and move it around until you see your brush. You can right click into any viewport and then move it around with the mouse. The 3-D viewport will catch your mouse if you do this; you can get out by right clicking again. You can zoom out with the mouse wheel. Practice this for a bit. If you get lost, click on View / Camera / Center. Also try View / Camera / Up Floor and so forth.

    (Right click) into the 3-D viewport lets you move it around.
    (Mouse wheel) zooms in and out.
    (Right click again) gets you back out.

    The 2-D viewports can simply be dragged by holding down the right mouse button. That's because if you right-click into them, you get a popup menu.

    One of the nifty things in Radiant is that you can select stuff both in 2-D and in 3-D view. Remember:

    (Shift - Click) selects stuff;
    (Esc) deselects stuff;
    (Backspace) deletes stuff.

    It is often better to work on stuff directly in the 3-D view. That requires a lot of practice, though. For now, it's probably easier to use the top and side views and control the results in the 3-D view.

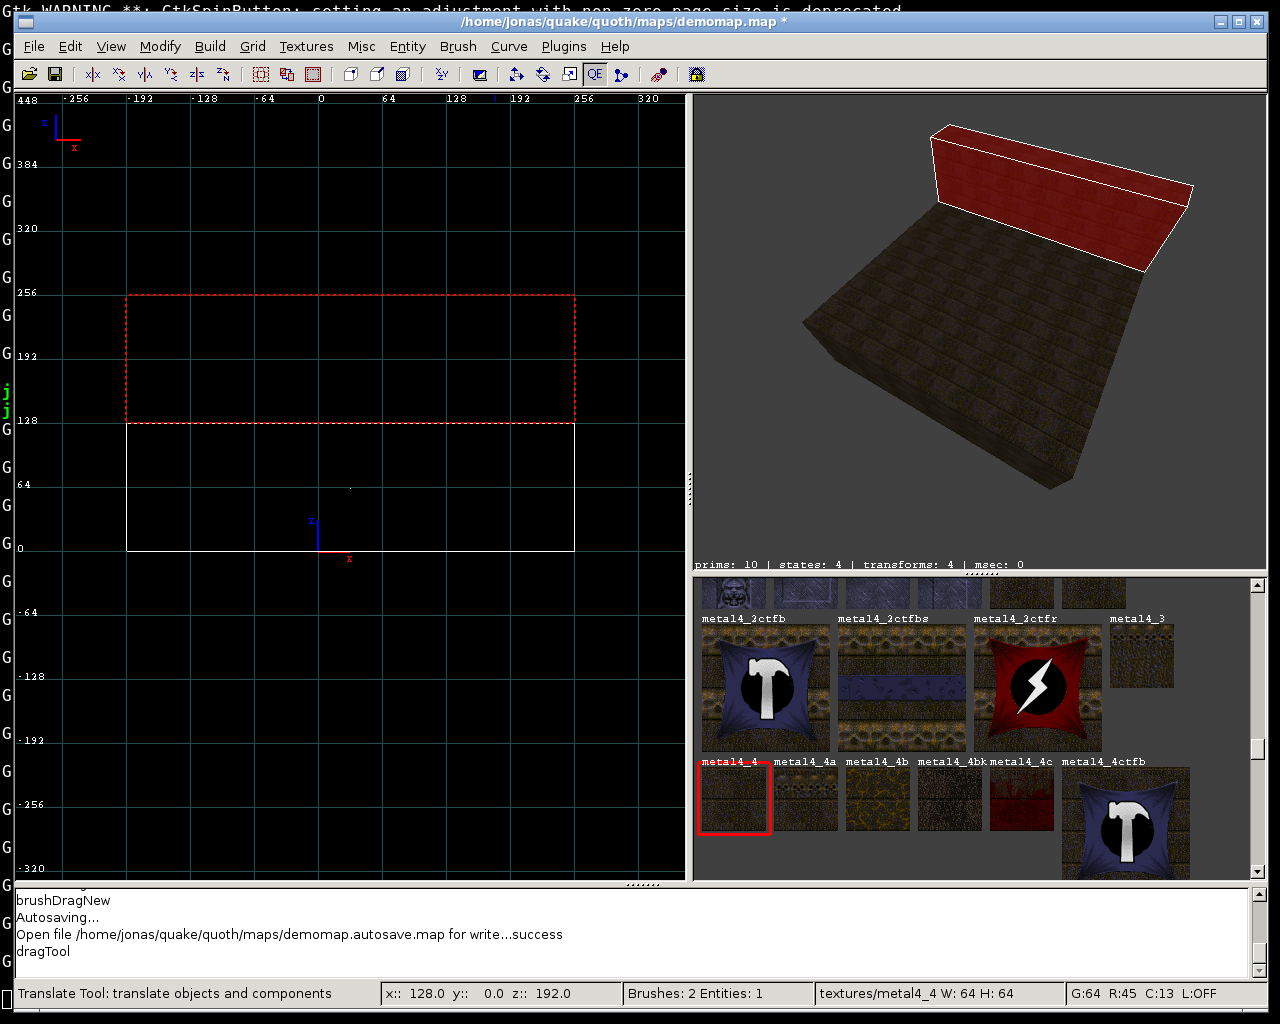
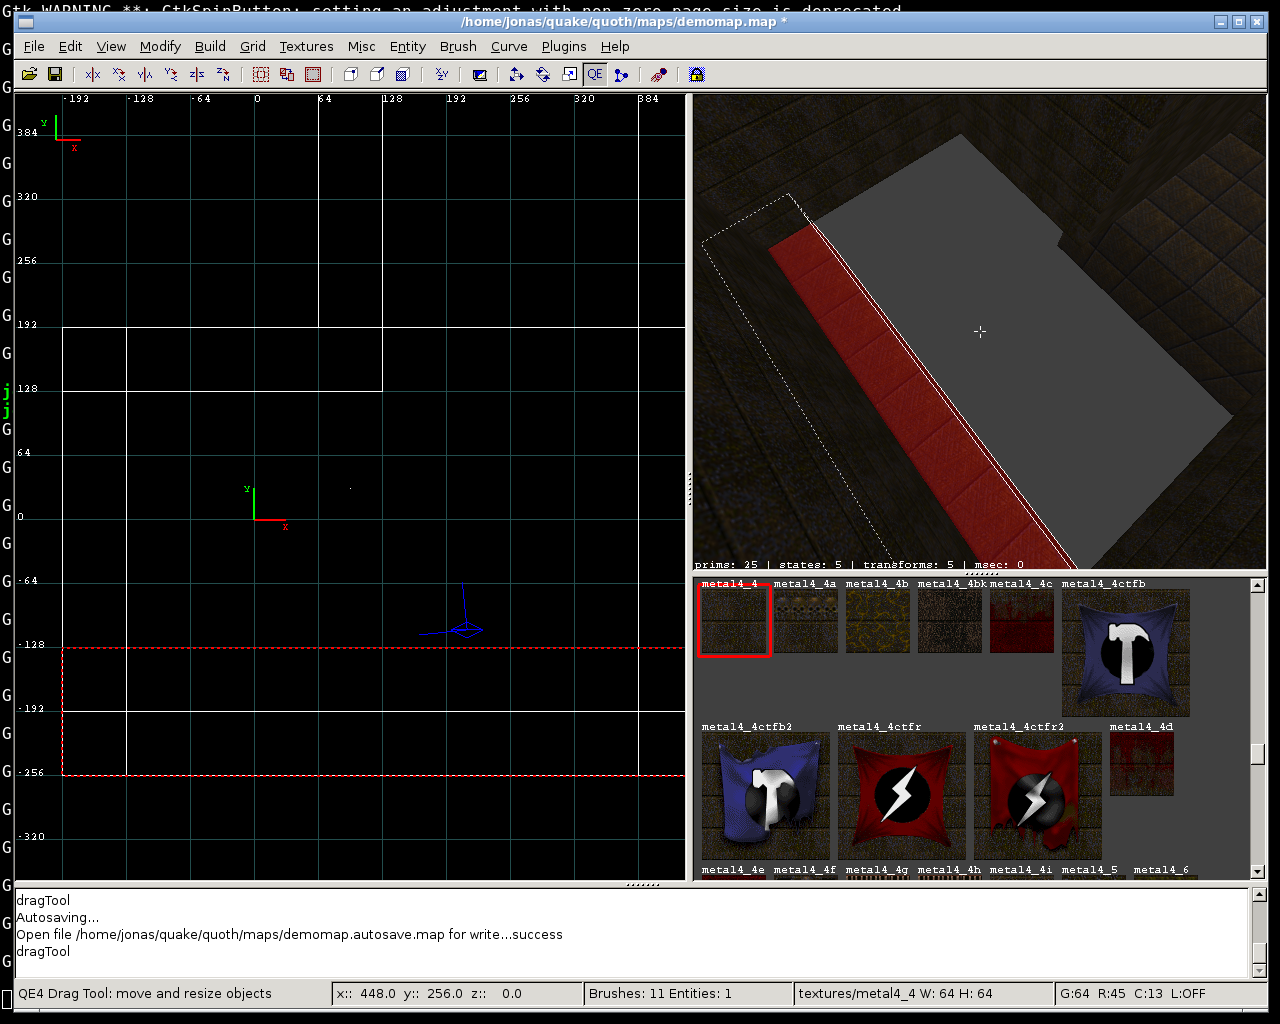
    6. Create another brush (remember to press Esc first to deselect any other brushes). Since I told you to make your first brush in the top view, which has X and Y in the corner (the side views have X/Z and Y/Z), you should have a sort of rectangular floor from the previous step. Make the new brush again in the top view, with the 64 unit grid, but make it slimmer. What you want to do is make a wall.

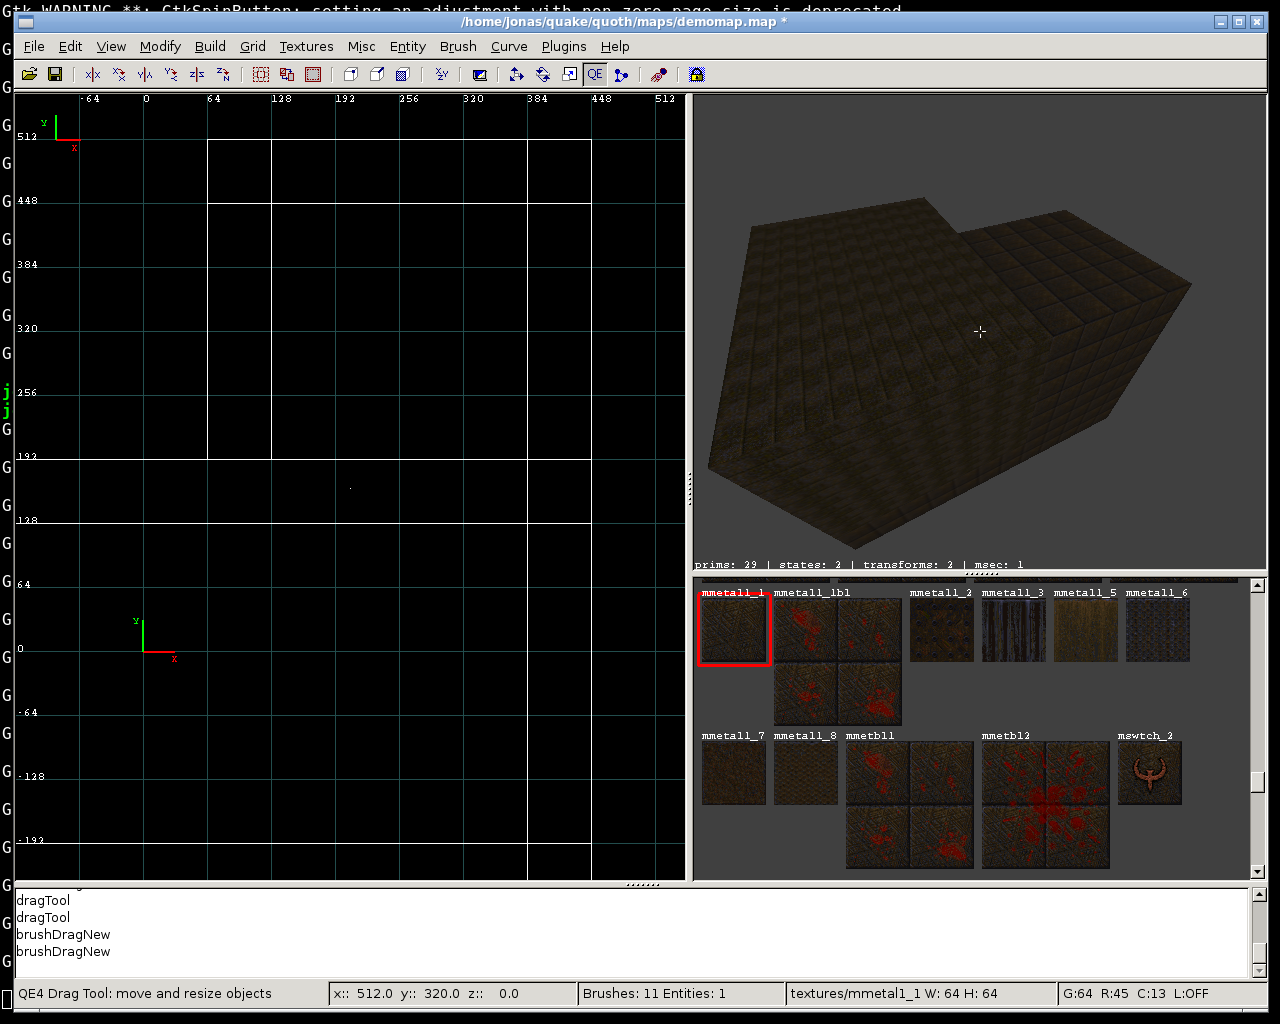
    In my case, the result is this:


    I have a wall now, but it's not standing on the floor. It's too low, so I must move it up. What I do is go to the side view, grab the brush that is still selected, and move it up so it stands on the floor, instead of hanging inside it.

    7. Moving and resizing a brush

    With my three-pane layout, I only have one 2-D viewport. I switch it to the side view (doesn't matter which one) by pressing Ctrl + Tab.

    (Ctrl + Tab) switches the top and side views around in the three-pane view.

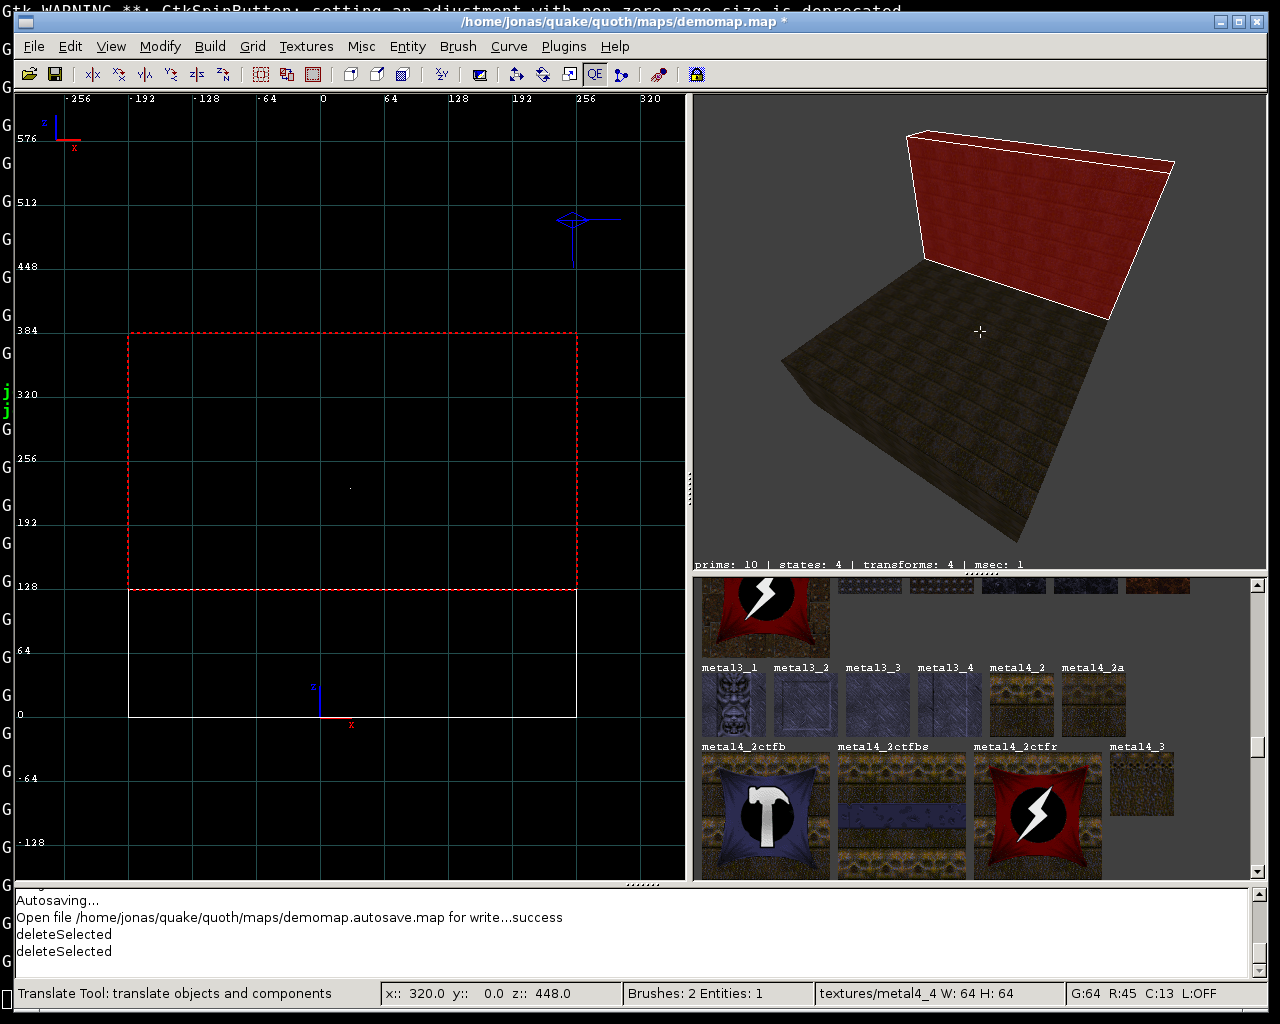
    In the side view, I simply click inside the red-dotted brush and drag it upward, until it stands on the other brush. For me, it now looks like this:


    And there is the wall. It's not really high enough, so again in the side view, I click close to the upper edge of that red dotted brush and drag that upward again. When you do this correctly, it will move only the edge of a brush, and thus enlarge or shrink the brush. It's not too tricky. If you accidentally move the brush, just move it back.

    (Click just outside a brush's edge and drag) will resize a brush.

    It looks like this now:


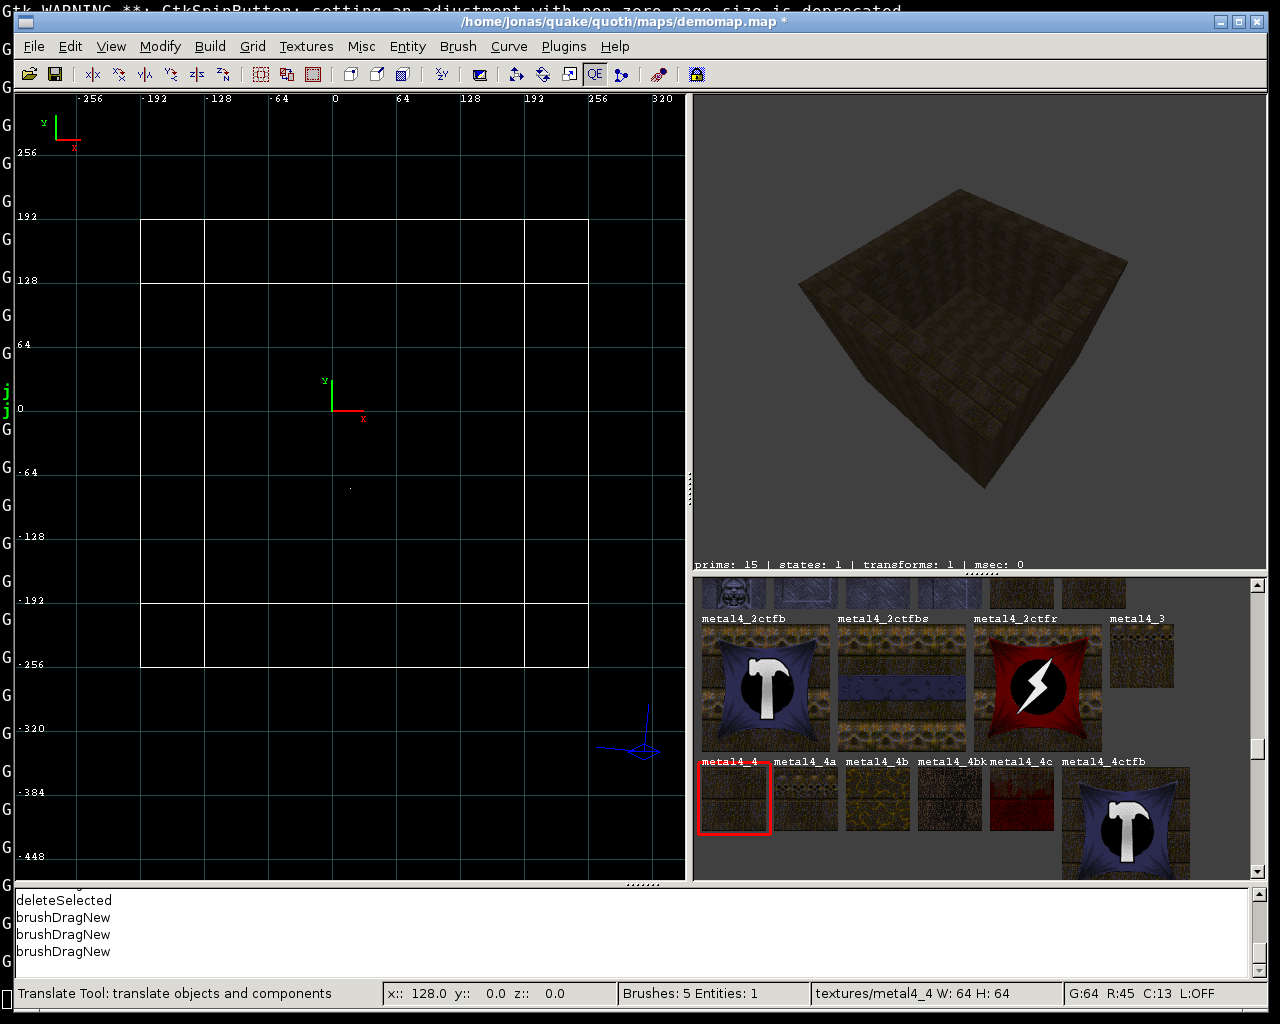
    OK, the wall is of the correct height. Now go back to the top view (X/Y) and draw the other walls one by one. You might notice in the 3-D view that Radiant automatically makes them the same height as your previous wall. That's a nifty feature. Remember to deselect (Esc) your finished brushes before working on new ones. Shift-Click reselects things. Backspace deletes. There is also an Undo function in the Edit menu.

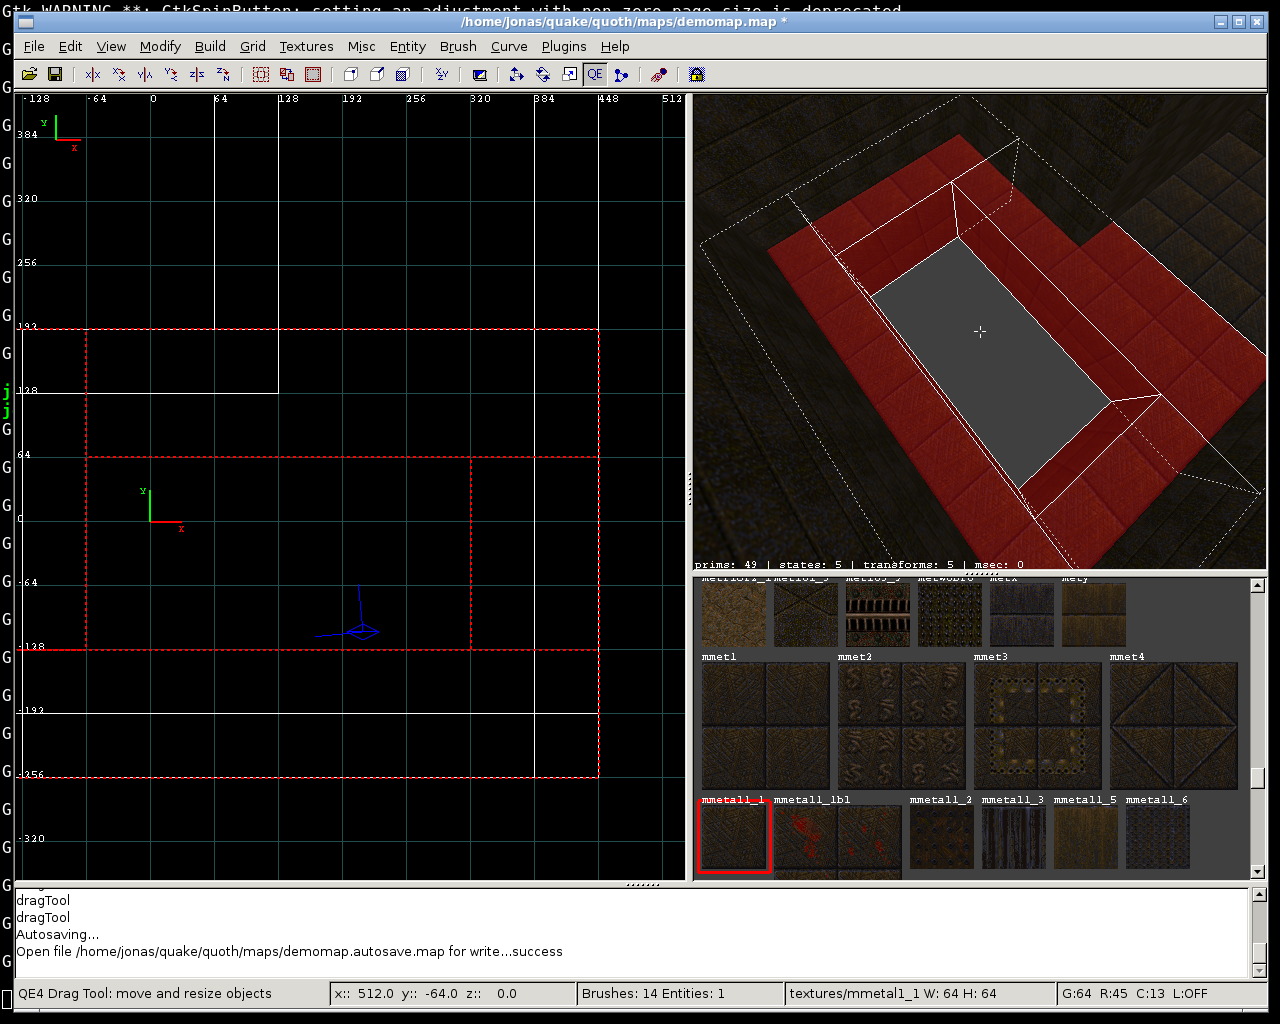
    You should quickly end up with this:


    It is OK to have overlapping brushes, by the way.

    8. Copy and paste brushes

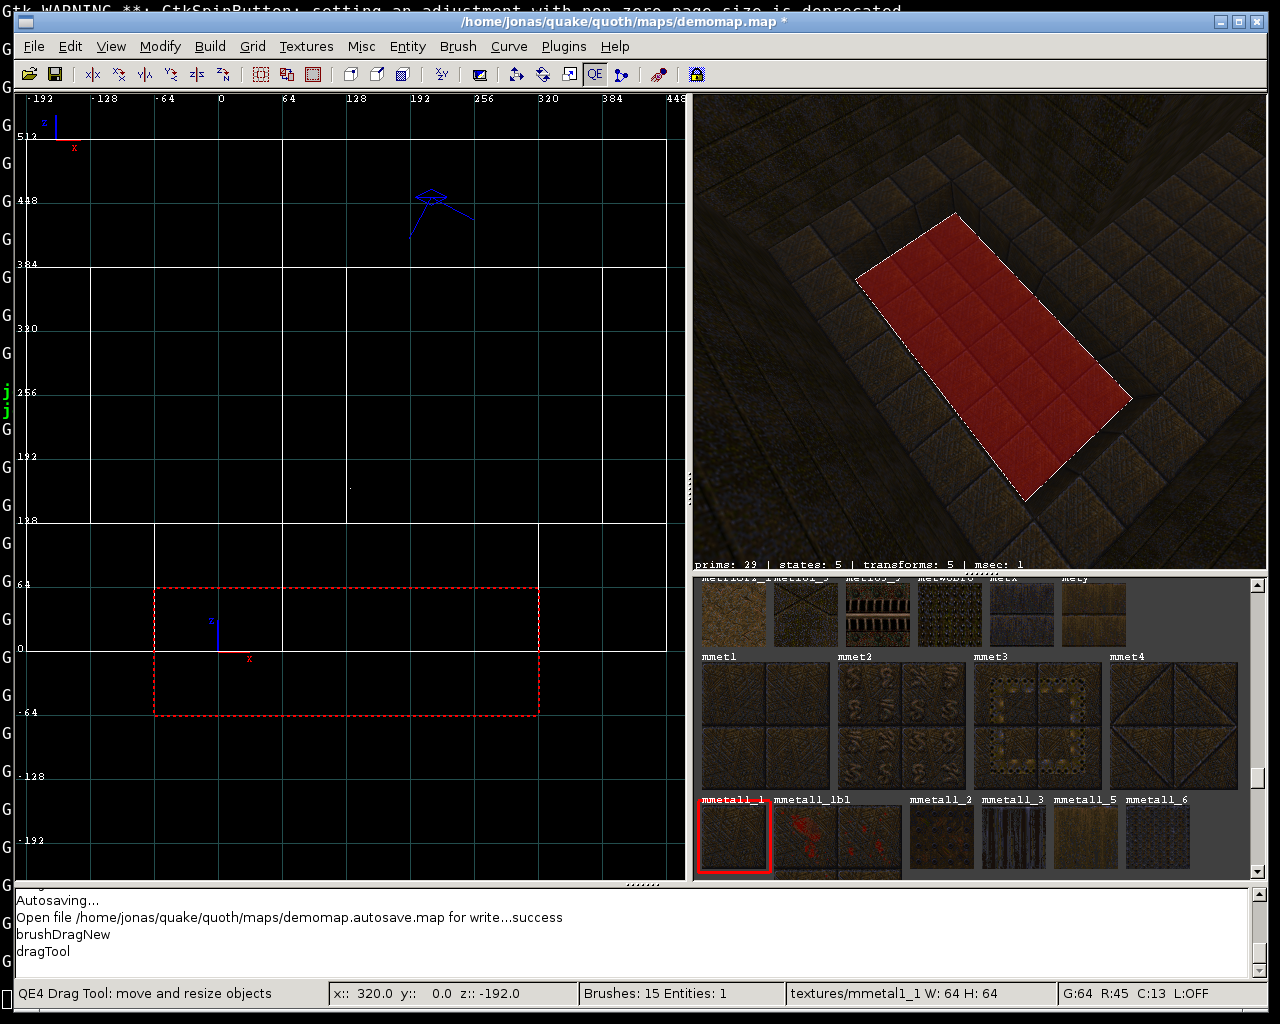
    What's missing? The ceiling. You know, we are just going to select the floor, copy and paste it, and use that as the ceiling. Let's go. Deselect everything (Esc) and select the floor (Shift-click). You can do that in the 3-D view if you want. Now to copy and paste:

    (Ctrl-C) to copy;
    (CTRL-V) to paste.

    You should end up with a copy of the floor that's exactly in the same place. Go to the side view and drag that new brush up with the mouse, until it makes a ceiling. You can move the view around by right dragging with the mouse.


    And we're done with the room. It's a bit stupid that every wall and the floor look the same. Let's put new textures on; it's really easy.

    9. Retexturing brushes

    Select the floor; make sure nothing else is selected, because we're going to texture everything that's not hiding quickly enough. So, select the floor (Shift-Click), scroll around the texture browser until you find some nice floor tiles, and click on that floor tile texture. Bam.


    Notice the floor tiles line up with the walls automatically, because our grid is the same size as the floor tile... and that's why the grid is the law. Usually. You don't want any floor tiles cut in half... usually.

    Next: Making that room suck less.
    Scout's Journey
    Rune of Earth Magic

    Comment


    • #3
      Great tutorial ! I'd loved to map for q1 but gtkradiant is not in my distro, and I failed to install it manually. As I don't want to use wine or Windows, I don't map at all.
      engine: quore.free.fr

      Comment


      • #4
        Huh, that sucks! Hmm, I could compile it and upload it for you though, shouldn't be a problem.
        Scout's Journey
        Rune of Earth Magic

        Comment


        • #5
          Sticky'd!

          Comment


          • #6
            Radiant basics, part 2

            Why, thank you Efess.

            Also, thanks Willem for Quaketastic where I shamelessly stored the images.

            We're going to take that glorious room from last time and make it look a little more interesting. We'll turn the rectangular room into an L-shape with different floor and ceiling heights, put a lava pool in the floor, a sky window in the ceiling, and add some of those demon faces and that cool rune trim.

            We're not going to build corridors. I don't want to hear "corridors". They're all rooms! Or at least "areas".

            1. Stretch that part...

            Fine, let's turn our box into an L. The reason is that box rooms are really uncool. Go back to the top view. Deselect (Esc) everything. Now select half of that room by shift-dragging. That's right, you select one thing by shift-clicking on it; you select several things (like all the brushes that make up half of this room) by shift-dragging. Shift-click, keep mouse button pressed, and drag. You'll find you are dragging a selection box over part of the map. Don't be afraid to select, copy and paste lots of stuff. How do you think all these monster maps are created?

            Anyway, shift-drag a nice box over one half of the room in top view. Make sure you have both the floor, ceiling, and three walls selected. Check this in the 3-D view.


            Notice how the far wall is not selected. That's because we're not going to move that.

            What we are going to do is drag that whole side of the room outwards a bit, to increase the size of the entire room. Now you can't just click and drag to do this, because you'd move the selected brushes, or enlarge only one of them. You'll have to select only certain edges and move those.

            An edge is exactly what it sounds like, btw. It'll all become clear soon. For now, while that stuff is still selected, press E. You'll go to "edge mode".


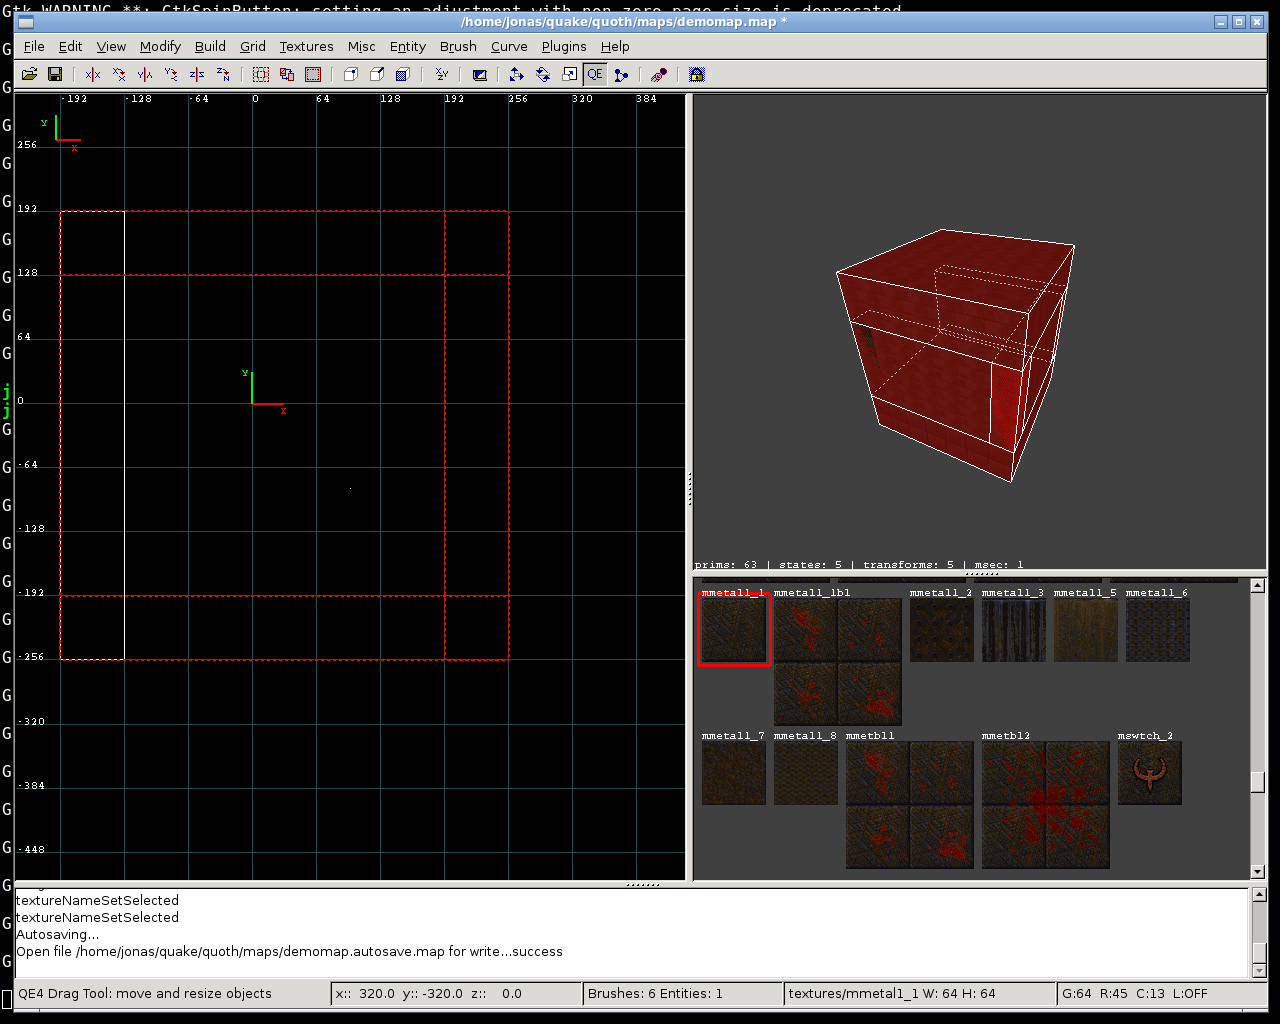
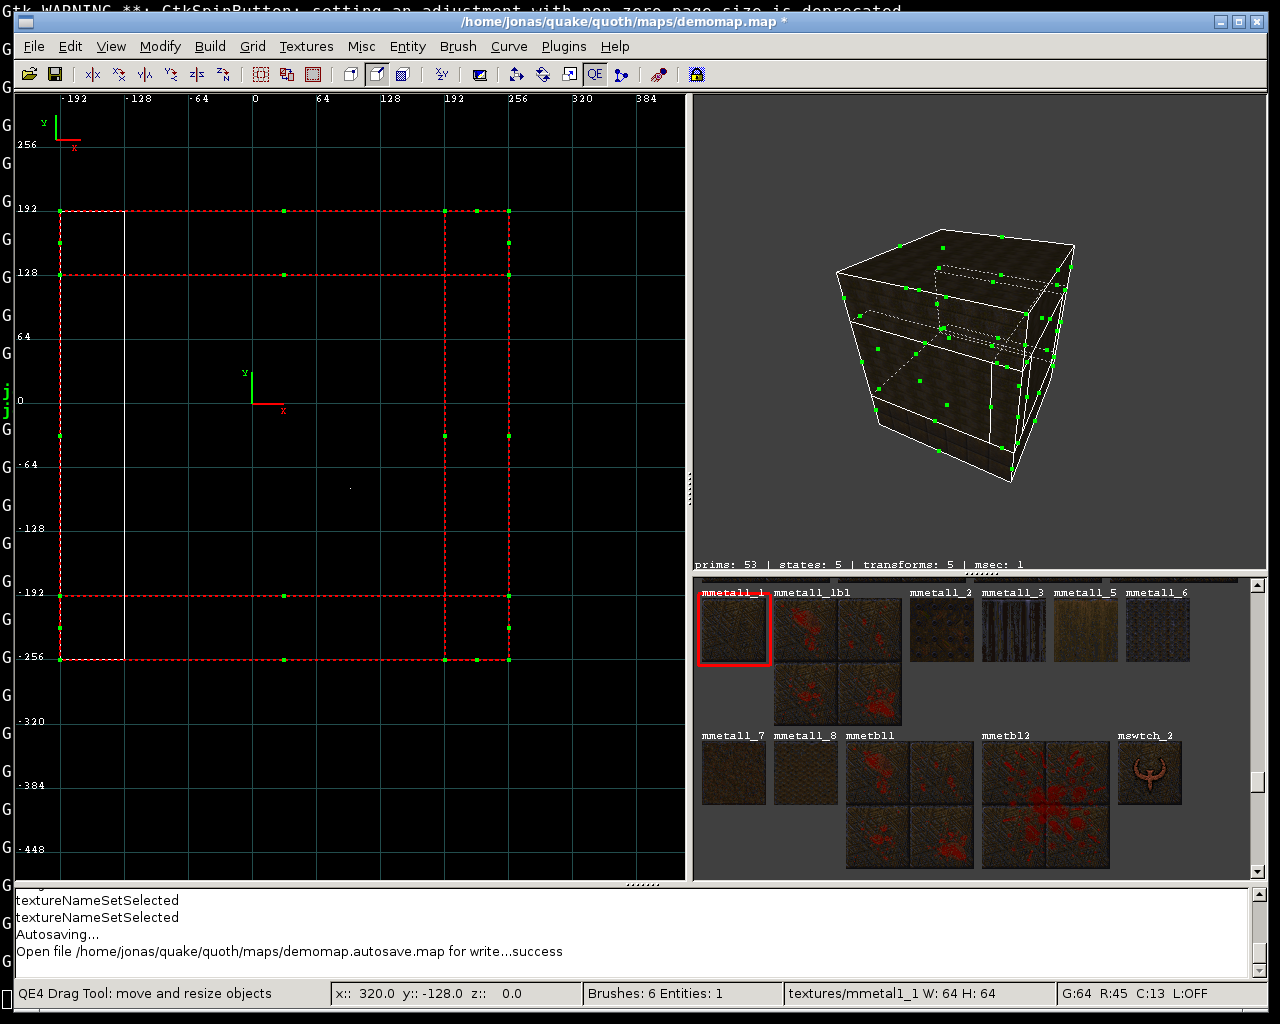
            Whoah. Those green dots mark the edges of a brush. More precisely, the edges of selected brushes. As you probably guessed, you can drag those around.

            Shift-click-drag another selection box. This time select only the edges on the far side of the room - the edges of the wall we're going to move, as well as those that belong to other brushes directly next to it. This may take a little practice, so here's the selection box:


            The selected edges now have purple markers. This means they're ready for pushing. Grab one of those selected markers with the mouse and drag it outwards. You'll drag all the other ones along by doing so.


            We stretched that room outwards quite a bit. This sort of operation is a little tricky, but with simple geometry, you can do it.

            (E) goes to Edge mode. Select brushes first, obviously.
            (Shift-drag) creates a selection box.
            (Drag an active edge marker) moves all those selected edges.
            (Esc) deselects those edges;
            (Esc) leaves the Edge mode (tool);
            (Esc) again deselects the brushes.

            2. L-shaped rooms are cooler

            Fine! Now let's create the "L". Note: We could just as well go for a T here, or a C. We're basically going back to the top view and drawing another room. You know how to make a room; draw the floor, draw a wall, position and resize the wall, then do the other walls and finally the ceiling. Refer to the box room tutorial above if needed.


            OK, there's the L. I did that new bit exactly like the old room. The new brushes now have the floor tile texture, because that was still selected. To fix that, click on one of the old wall brushes in the 3-D view with the middle mouse button (mousewheel). That selects the old wall texture again and brings it up in the texture browser.

            (middle click on texture in 3-D view) selects that texture.

            Just a matter of selecting those mistextured walls now, and clicking on the correct texture in the texture browser. If you accidentally select the floor, just shift-click it again to deselect.

            (Shift-click on a selected brush) deselects that brush.

            The other issue is that one of the old walls is now separating that new part. We don't want that, so use the 3-D view to zoom into the room, select that old wall, and move it back far enough to reveal the new part.


            3. Hot stuff

            Cool, now for the lava pool. While you're inside the 3-D view, shift-click the floor in the larger part of the room to select it. Move over to the top view, and pull one side of that floor downward until you have this:


            Deselect that brush and then middle click it to select that floor texture again if it isn't already. Go to the top view and draw new floor brushes, until you have something like this:


            Radiant will, again, make them all the same height as the first one. The tiles will line up correctly since we're still on our 64 unit grid. What's missing? The lava, duh. Draw one more brush in the top view to plug that hole in the middle. Now there is one problem.

            In Quake maps, fluids may not touch the void.

            If you just make that central brush lava, your map will have a leak. You have to put a proper floor into your pool before filling it with lava. So take that final brush you just made, and switch to the side view because you're going to pull that down to make a pool.


            Now, still in the side view, we'll copy and paste the pool floor, because it has the right size, and move it up slightly to make lava. But first, go to the grid menu and select Grid 32. That's because we don't want the lava flush with the floor - we want it a bit inside the pool. When you have the grid set to 32, copy and paste (Ctrl-C and Ctrl-V) the pool floor and move it up... 32 units. Then, while that is still selected, click on a lava texture.


            Et voila. Notice the smaller grid! Switch it back to 64 for now. We'll return to a smaller grid later for doing details.

            4. Variation

            It is usually a good idea to vary both floor and ceiling height in your level. A flat level is a boring level. It's good to have some things that catch the eye, such as ramps or stairs. In short, variation is a must.
            Let's start by pulling the ceiling of that other part down. The part without lava. Select the ceiling brush, then, in the side view, pull it down a little. While we're there, switch to the 32 unit grid again, select the floor brush of that part, and pull it up by 32 units. Switch the grid back to 64 again.


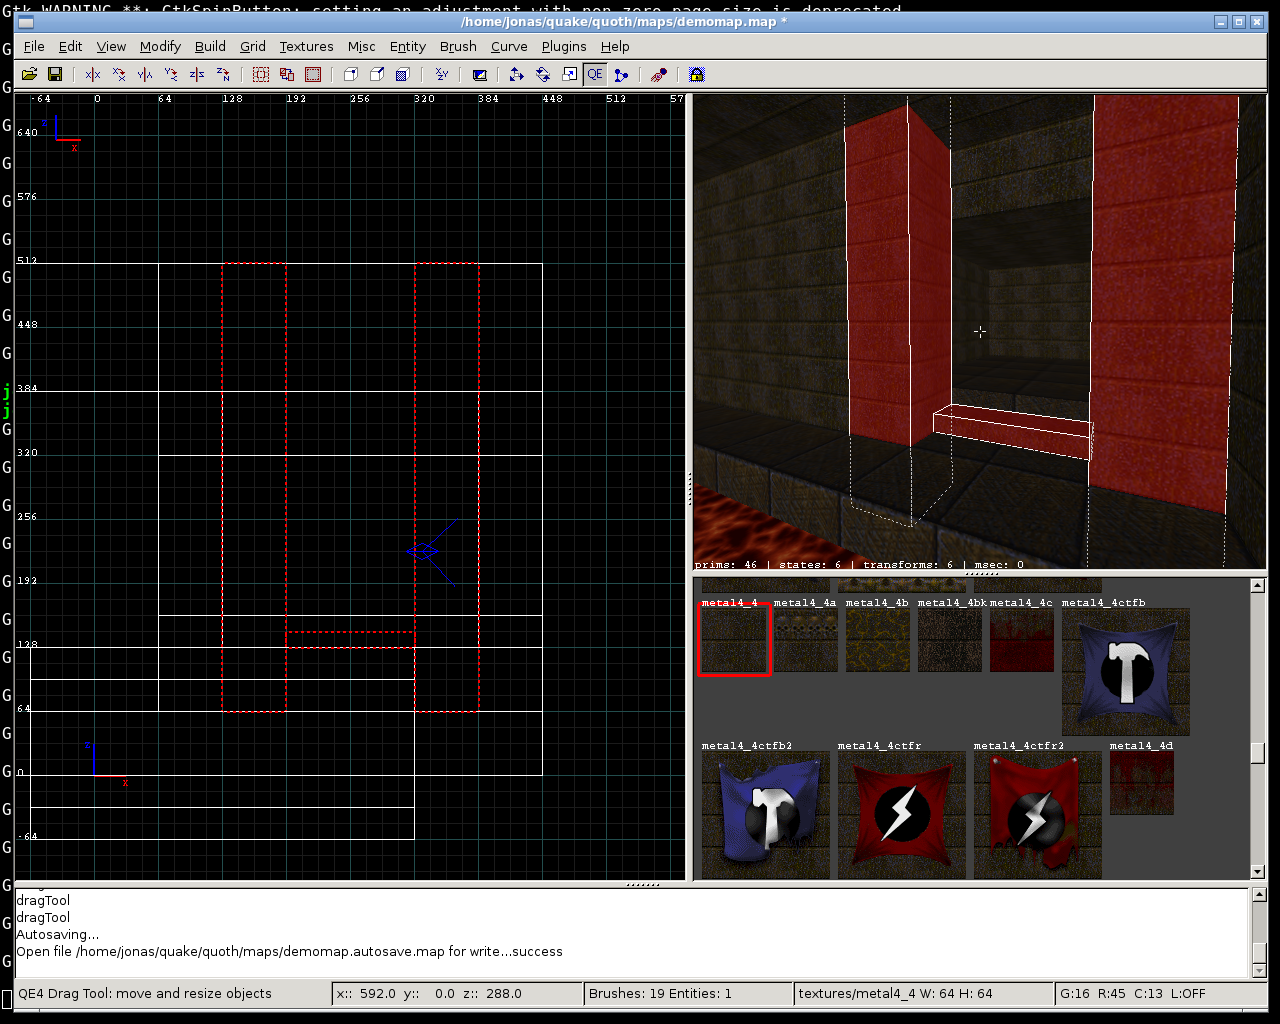
            On the 64 unit grid, let's put a couple pillars in front of that. Then we'll build a step for players to climb - the maximum step height in Quake is 18 units. Make the step a brush that is 32 units wide and 16 units high; this means that you draw the brush on a 32 unit grid in the top view, then switch the grid to 16 and go to the side view. Then reduce the step's height to 16. This is what it looks like:


            5. Angles; face mode; texture alignment.

            Those pillars suck, so I'll muck around with them. I''l go to the top view, reduce the thickness of those pillars to 32 units (remember to switch the grid to whatever size you need), copy and paste them (both at once), and use the pasted parts to restore the original thickness. Now I have the same pillars, but made up of two halves each.

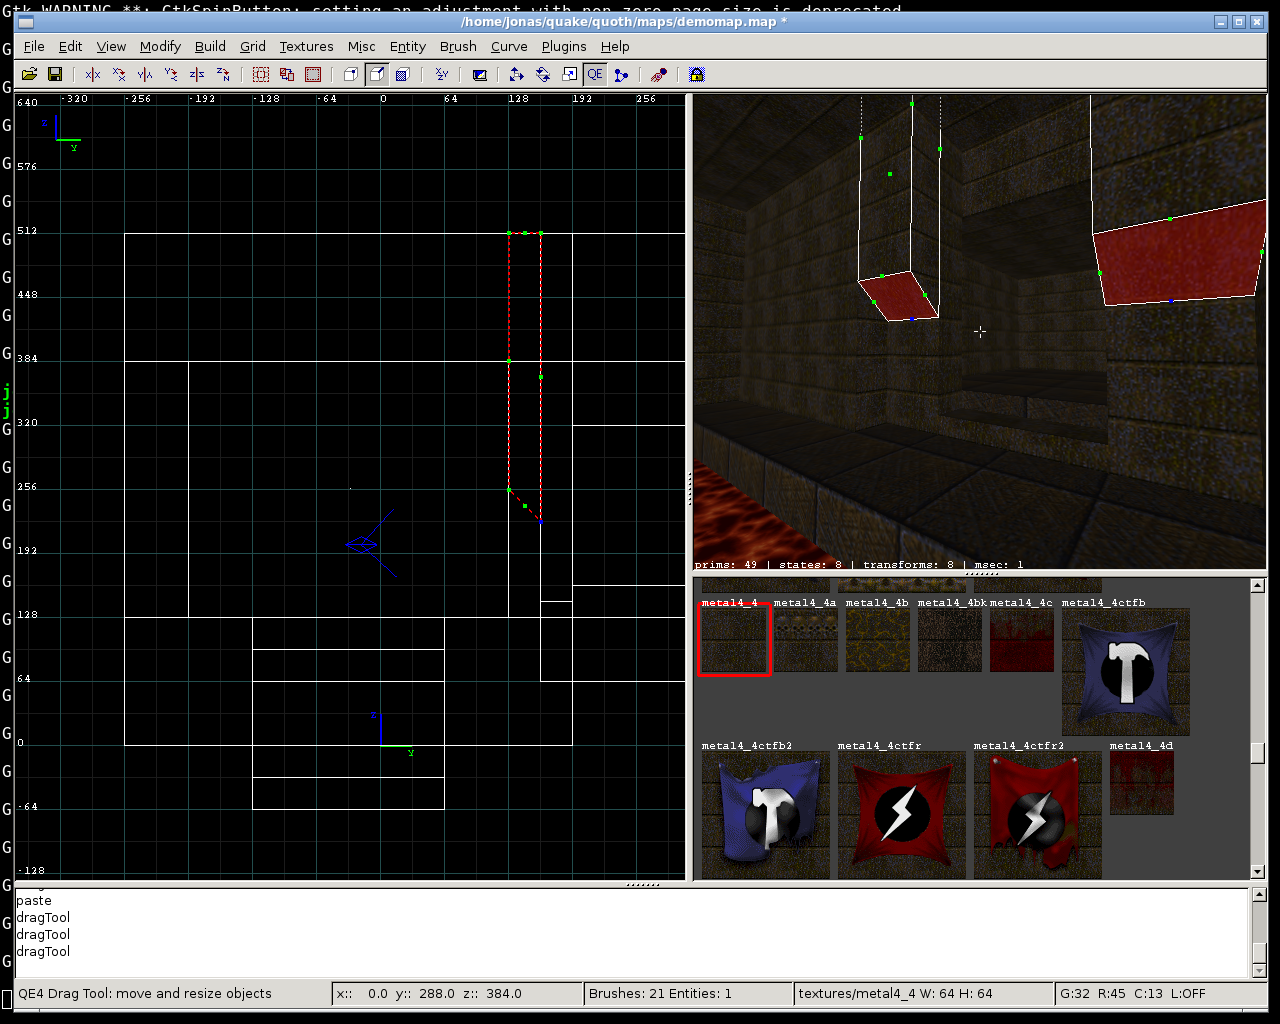
            I'll go to the side view, and pull the bottom part of the pasted brushes up. With them still selected, I press E to go to Edge mode. I'll move the back edges down to give me this:


            To make these slanted thingies stand out more, I'll turn them into lights. Deselect everything (Esc repeatedly), then select the two brushes that have the slanted faces. Then press F to go to "Face mode".

            (E) goes to Edge mode (tool);
            (F) goes to the Face mode (tool). Select brushes first.

            This works similar to the edge stuff, only you're selecting whole faces. A face is pretty much what it sounds like - one side of a brush. You can select faces the same way as anything else. You can also texture them. Select those slanted faces and click on a fitting lamp texture (in this case a 32 x 64 one). And bam, lamps done.

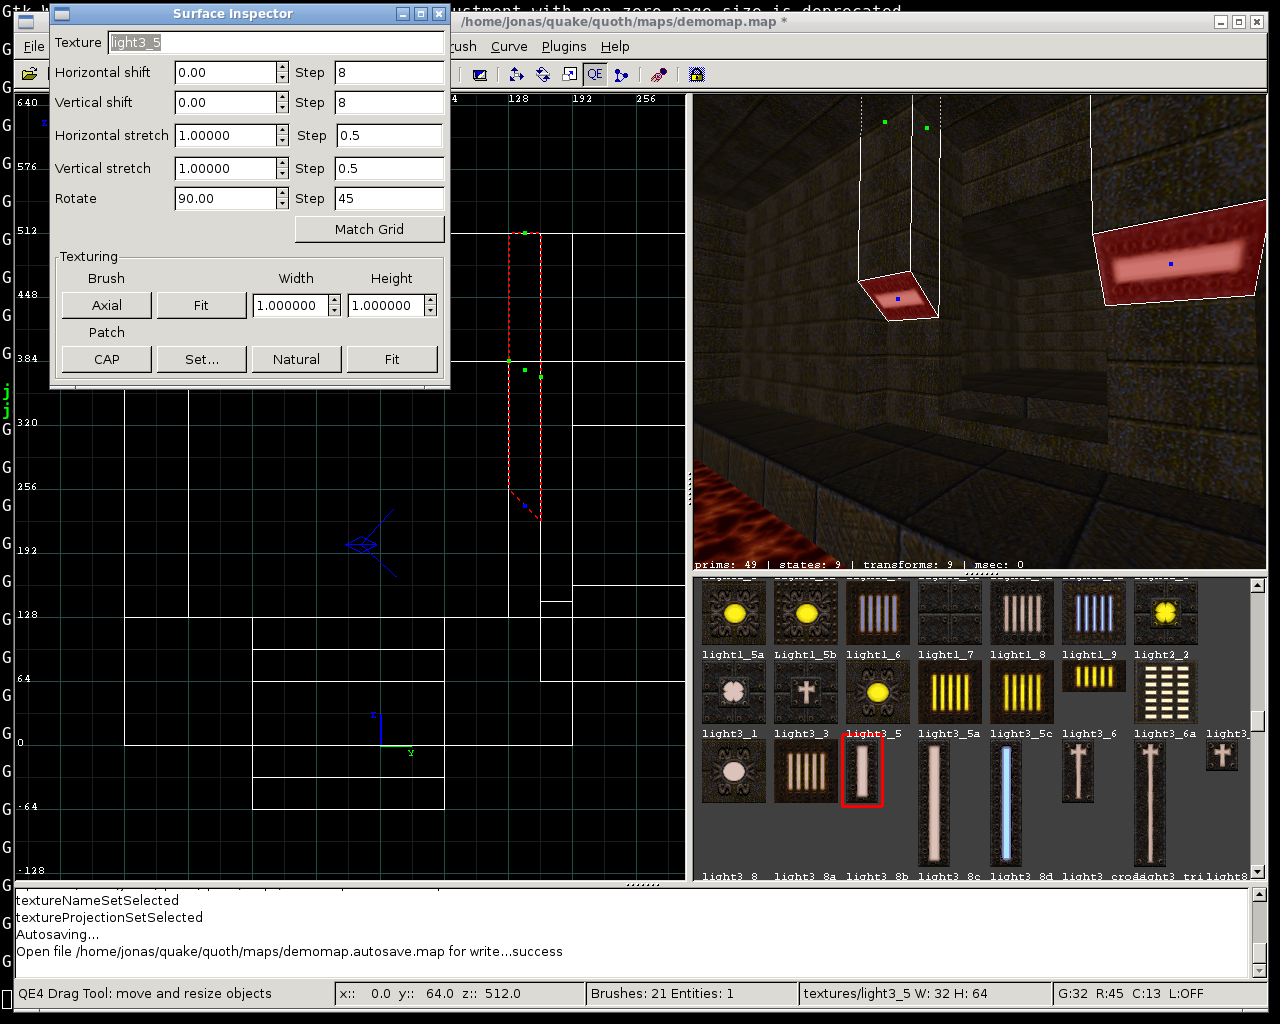
            The problem here is that the lamp texture is vertical, while the faces we want to texture are horizontal. The solution: Aligning the textures to fit the face. Press S to bring up the Surface inspector:


            See how I rotated those textures by 90 degrees to fit the faces? I put "90" in the Rotate box. I could do quite some other things in the surface inspector, such as moving textures around on faces, or scaling them to fit a face. Oftentimes, all you do in the surface inspector, when you have some texture misalignments (because you didn't build on the grid, or you built weird stuff) is click the "Fit" button to make Radiant guess how you want the texture aligned.

            (S) opens the surface inspector (select faces first).

            Next: Sky window, details, and entities.
            Scout's Journey
            Rune of Earth Magic

            Comment


            • #7
              Originally posted by golden_boy View Post
              Huh, that sucks! Hmm, I could compile it and upload it for you though, shouldn't be a problem.
              That's very kind of you. I tried again to compile gtkradiant but only get those verbose python's dejections. But there's stabilized fork :

              NetRadiant - NetRadiant - Alientrap Development

              And it works !
              engine: quore.free.fr

              Comment


              • #8
                Can I just say how awesome this thread is? I'm not a mapper by any means, but something like this happening is genuinely awesome.
                IT LIVES! http://directq.blogspot.com/

                Comment


                • #9
                  NetRadiant

                  NetRadiant is GTKRadiant with a couple tweaks. It's still Radiant 1.5, though, and all the basic commands are the same.

                  If you can't easily install GTKRadiant 1.5, then grab NetRadiant instead.

                  NetRadiant - NetRadiant - Alientrap Development

                  You can get the Quake 1 gamepack here (thanks Spirit for the link):

                  http://ingar.satgnu.net/files/gtkrad.../QuakePack.zip

                  After extracting that, move games/q1.game into your Radiant installation's games folder. Move the q1.game directory into your Radiant folder.

                  Double check that the paths are correct. You want this:

                  Radiant/games/q1.game (config file)
                  Radiant/q1.game/id1/entities.ent (entity definition file)

                  If you have them, you're set for Q1 mapping. Remember to put your texture wad files into Quake/id1 or symlink them there. Also remember to set the game path (press P when in Radiant). Finally, don't forget to select "Quake" in the project settings menu.

                  Both Linux and Windows installations of Radiant use the same gamepacks.

                  You can also get the gamepack files here:

                  https://zerowing.idsoftware.com/svn/.../Q1Pack/trunk/
                  Scout's Journey
                  Rune of Earth Magic

                  Comment


                  • #10
                    Radiant basics, part 3

                    OK, I promised you a sky window and rune trim. I shall deliver.

                    But first, here is a neat little trick I found while working with Radiant on some maps. It's about:

                    1. Faster movement in the 3-D port.

                    Right-click into the 3-D viewport as usual. This will latch your mouse to the camera. Remember you can just right-click again to leave the 3-D viewport. I told you to zoom around in the 3-D view by using the mousewheel; however, that quickly makes your fingers hurt. It is also terribly ineffective. Imagine you could move around the 3-D view just like you do in the game. Here's the good news: You can!

                    While you're in the 3-D viewport, try using the arrow keys. Up, down, left, right. You'll notice the arrow keys work exactly like WASD does in the game. Combine that with mouse movement, and you can zoom around the 3-D viewport faster than a dimensional shambler. That's much better than the mousewheel.

                    You can rebind those movement keys to, say, WASD. But watch out, be sure to put the commands that are bound to WASD onto some other keys first, otherwise the surface inspector (S) might pop up when you want to move backwards...

                    There's a list of currently active keybindings in the Help / Shortcuts menu. NetRadiant allows you to edit key bindings directly in the menu. The config file for gtkradiant is located in

                    $home/.radiant/1.5.0/q1.game/shortcuts.ini

                    at least in my case.

                    If (like me) you're one of these weird people who play with an inverted mouse, you can set that in the preferences; press P for the preferences window and go to Settings -> Camera. You'll find the mouse settings for the 3-D viewport there.

                    Good, let's move on to that sky window now. You'll learn some new tricks about

                    2. Selecting faces directly; aligning textures on multiple faces at once.

                    I'll load up the L-shaped room from last time now. First thing in the morning, I'll rip open the ceiling in the lava part to let the sun in. Remember how we built the lava pool? The sky window is very similar.

                    Switch to the 64 unit grid, if that's not already set. Make sure you have the QE button active (QE4 Drag tool). Now turn the solid ceiling brush into something like this:


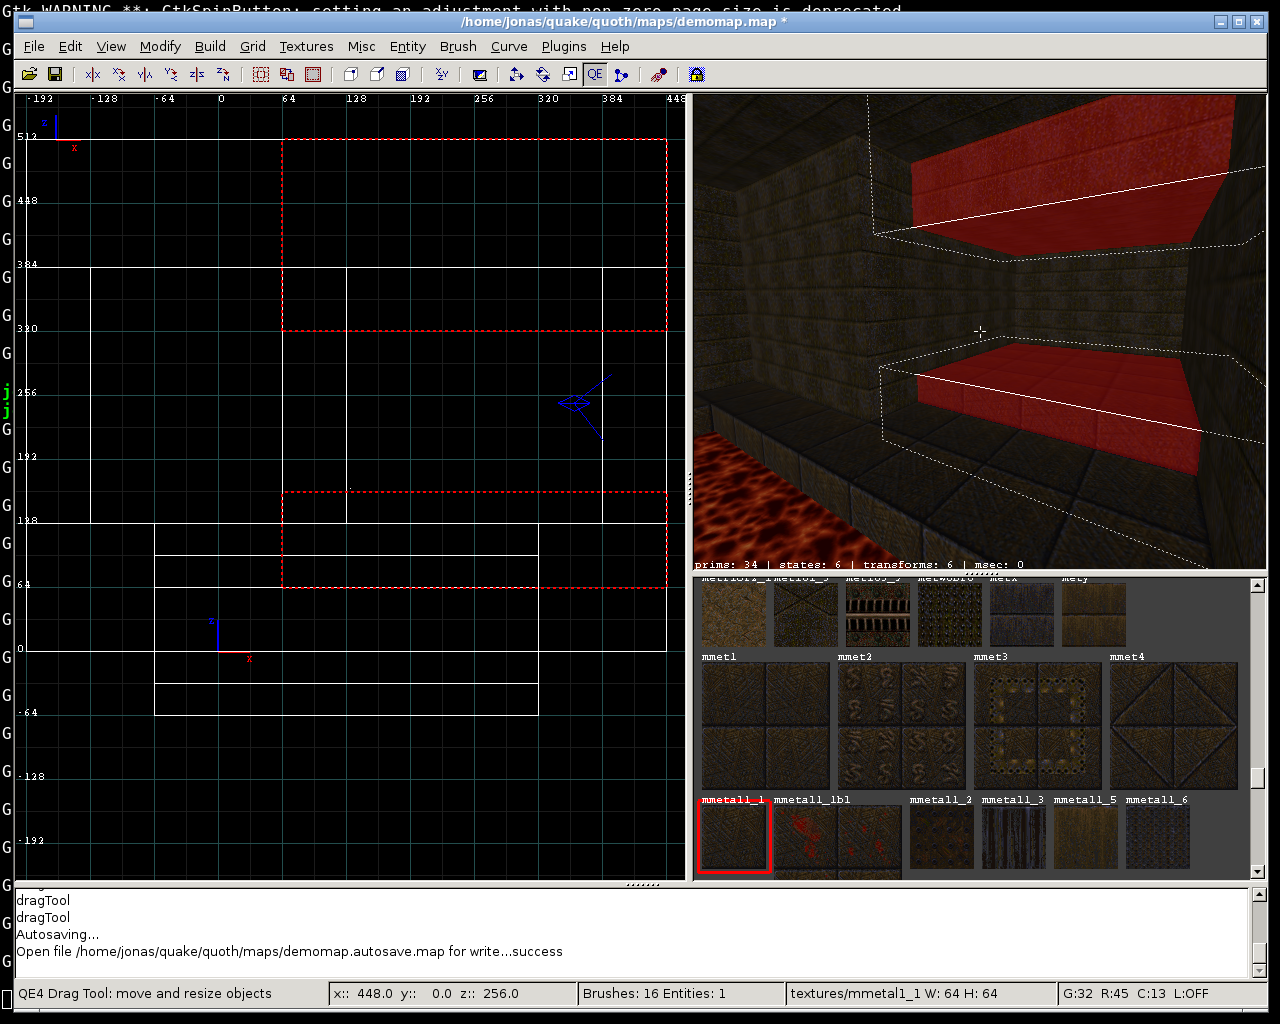
                    What I did was to pull one side of the ceiling brush back. Then I drew new ceiling brushes to create that "ring". Remember, clicking and dragging in the top view creates brushes. Radiant automatically made the new ones a high as the original ceiling brush.

                    Finally I selected the whole ceiling "ring" and in the side view, resized it around the top part until it was only 64 units thick. That's what you see in the screenie.

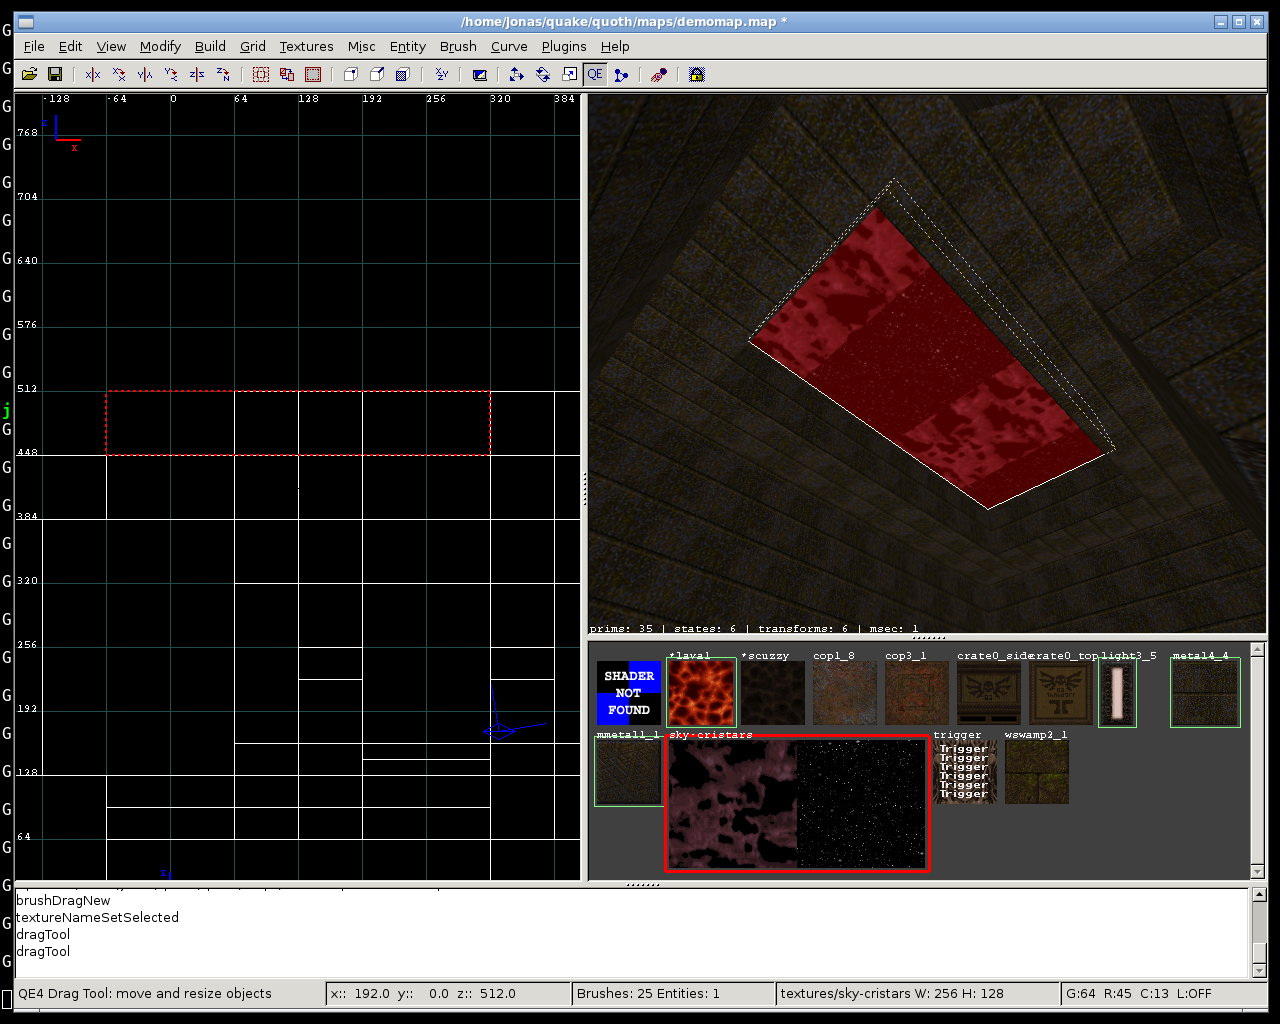
                    Next, draw a final brush in the middle to plug the hole. Click on a sky texture in the texture browser. Bam! Sky finished.

                    Actually, I'm going to, from the side view, pull that sky brush up a bit, so it's not flush with the ceiling. The result:


                    Notice that sky brushes, unlike fluids, may touch the void. That's fine. Sky is special, quite simply. The sky texture looks a little weird; that's fine, that's what creates the scrolling sky effect in the game. Or maybe you want to use a skybox for your map later, which will then be displayed instead of Quake's normal sky.

                    Why did I place the sky brush 64 units above the cutout in the ceiling? Simple: I want to put some trim around that sky window, to make it look a little less Hunnic and a little more refined. What's trim?

                    TRIM means all sorts of details that make your map look less boring. For example those demon faces, runic doorposts, ornaments in sky windows, and frames of a different texture around all sorts of stuff are called trim.

                    You know what, I'll just create a 32 unit frame with some rivet texture between the ceiling and the sky. And after that, I'll even put some "X" shaped ornament in there, like you often see in vanilla Quake.

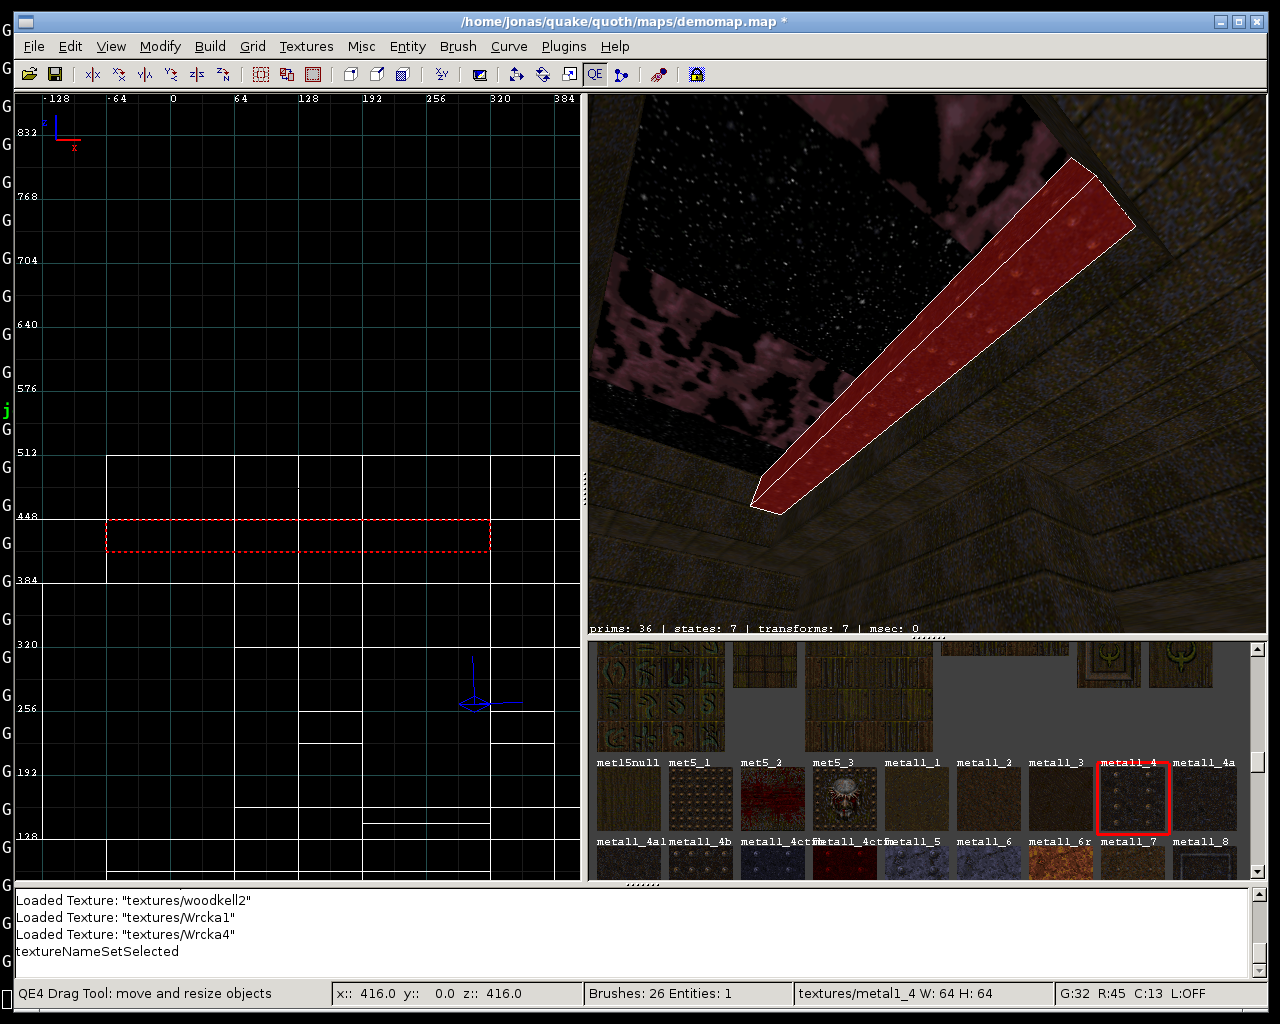
                    Let's switch the grid to 32 and do the first brush of that frame. Simply click and drag in the top view, as always. Remember you can switch between top and side views by pressing (Ctrl + Tab), if you're like me and only use one 2-D viewport. Anyway, go to the top view and draw that frame brush on the 32 unit grid like this:


                    Notice I'm in the side view there actually, because I had to reduce the brush's height after I drew it. I also clicked on some blueish rivet texture for that trim. Now again in the top view, simply draw the rest of the "frame":


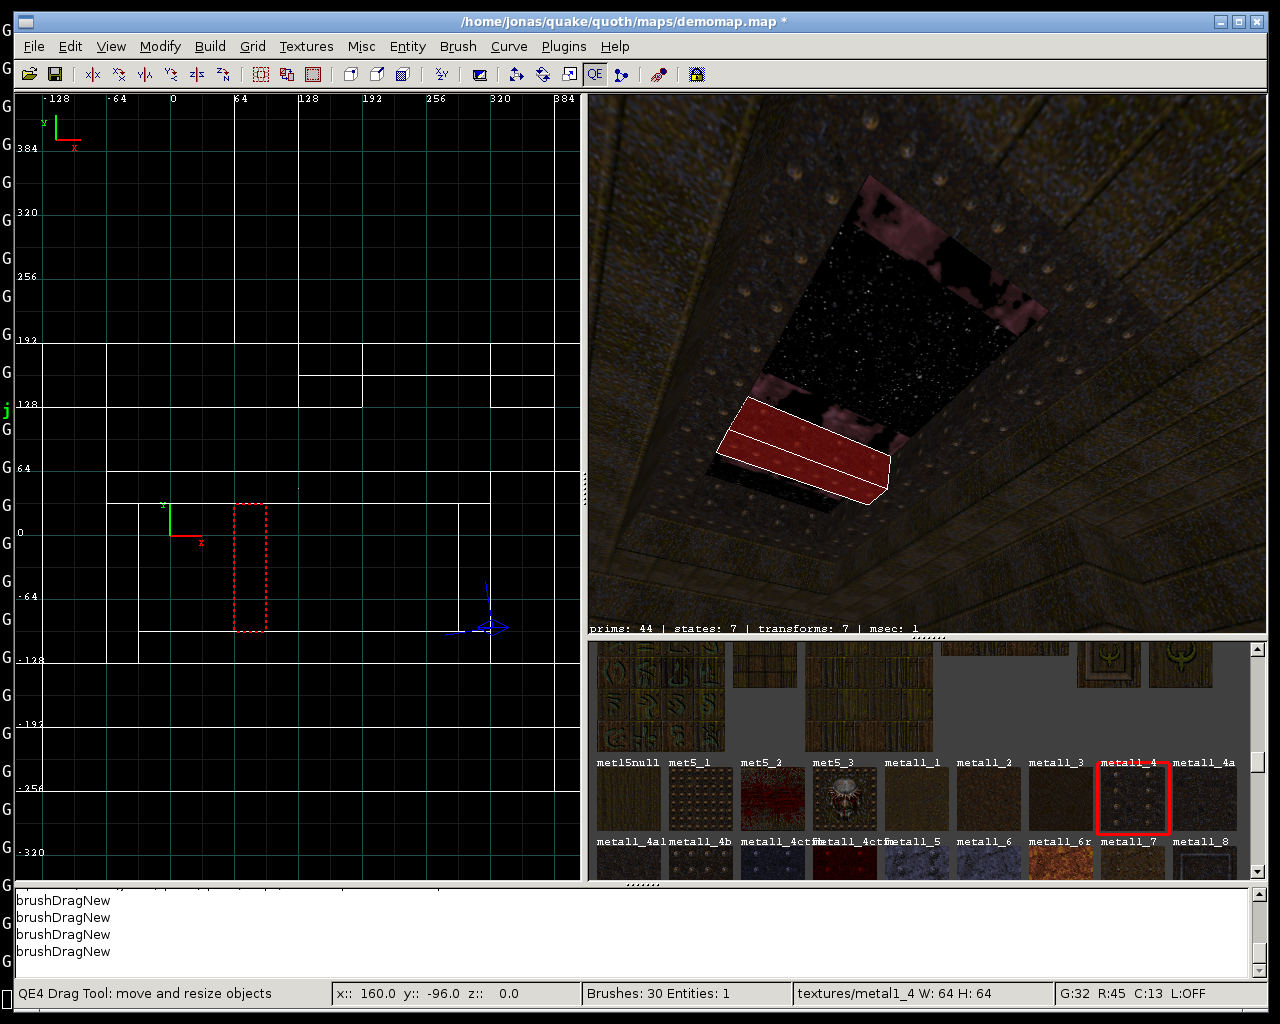
                    And that's the trim for the sky window. Actually, I'm going to do the "X" ornament now. First, draw another 32x32 brush (you're on the 32 grid still right?):


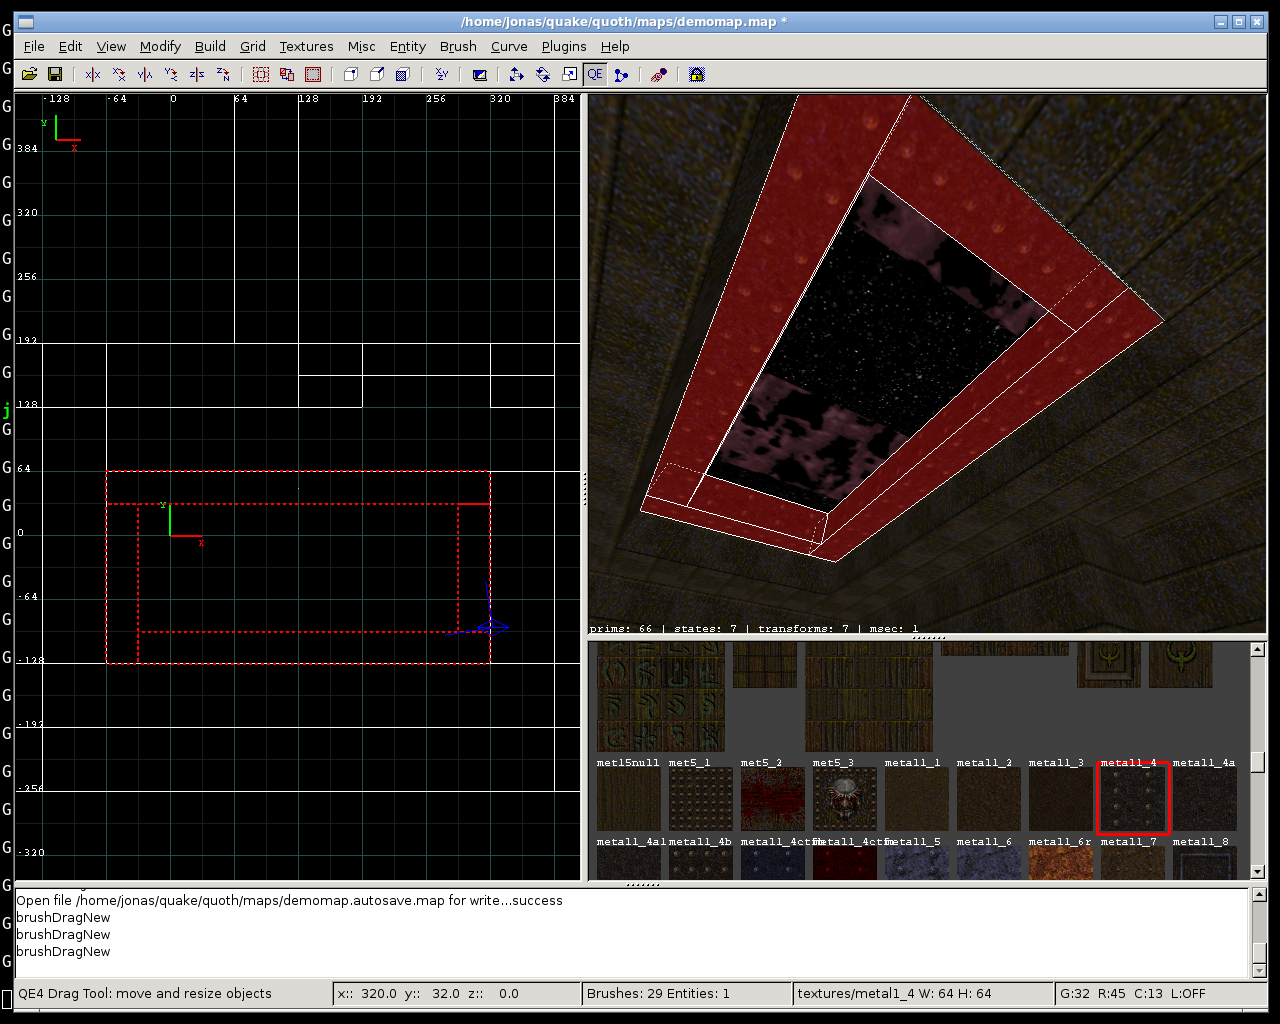
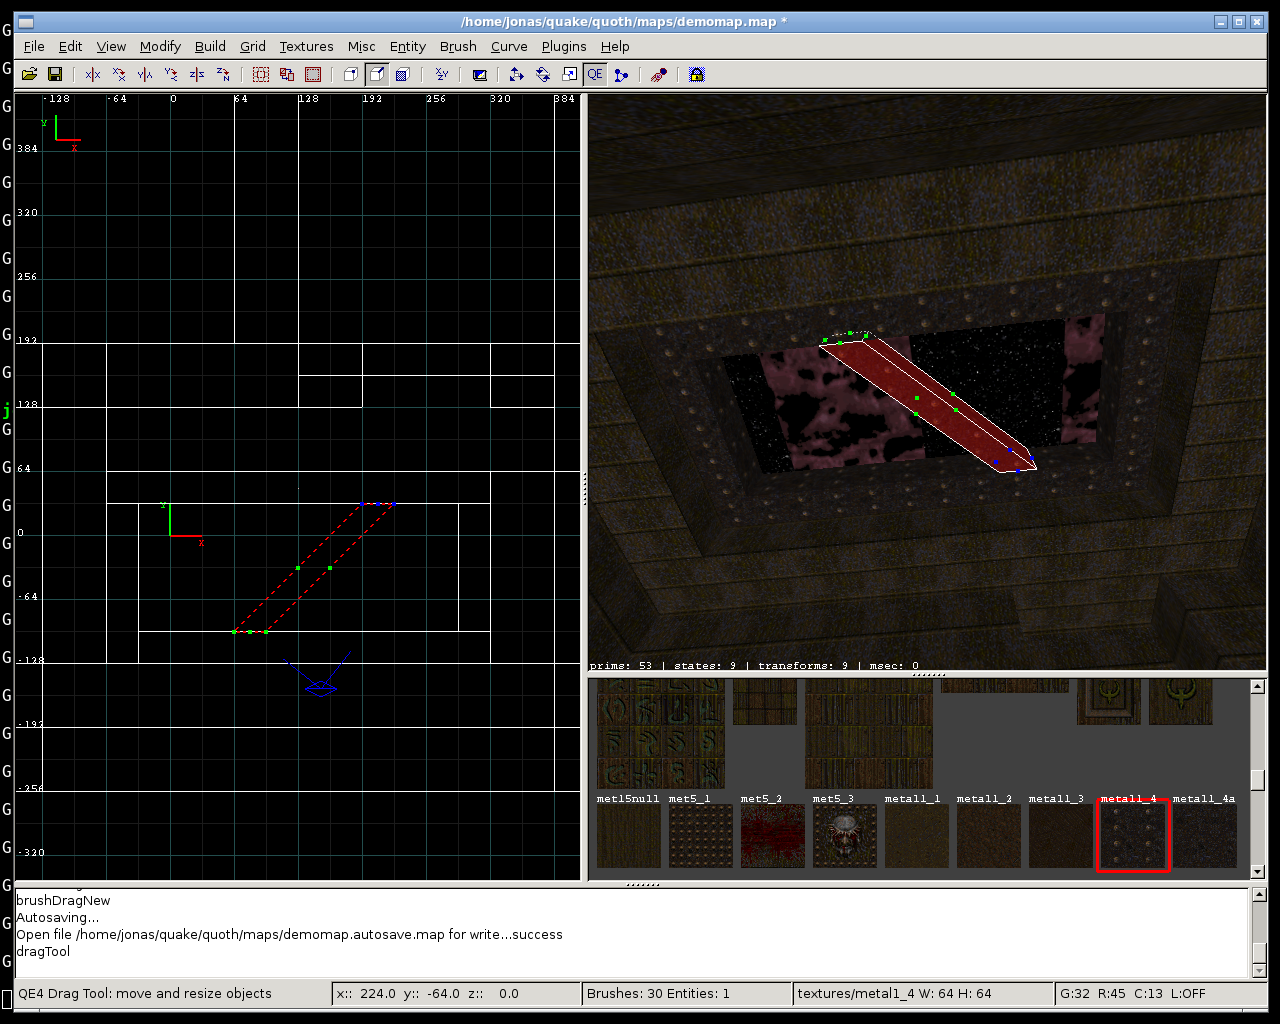
                    And with that still selected, press E to go to Edge mode. Draw a selection box over one end of the brush, and then skew it by dragging on the selected edge markers:


                    Skew the brush in the top view until it is exactly diagonal. You can verify that it's diagonal (ie at a 45 degree angle) by counting the squares of the grid; if it goes one to the side, one to the top and so forth, it's at a 45 degree angle. :-)

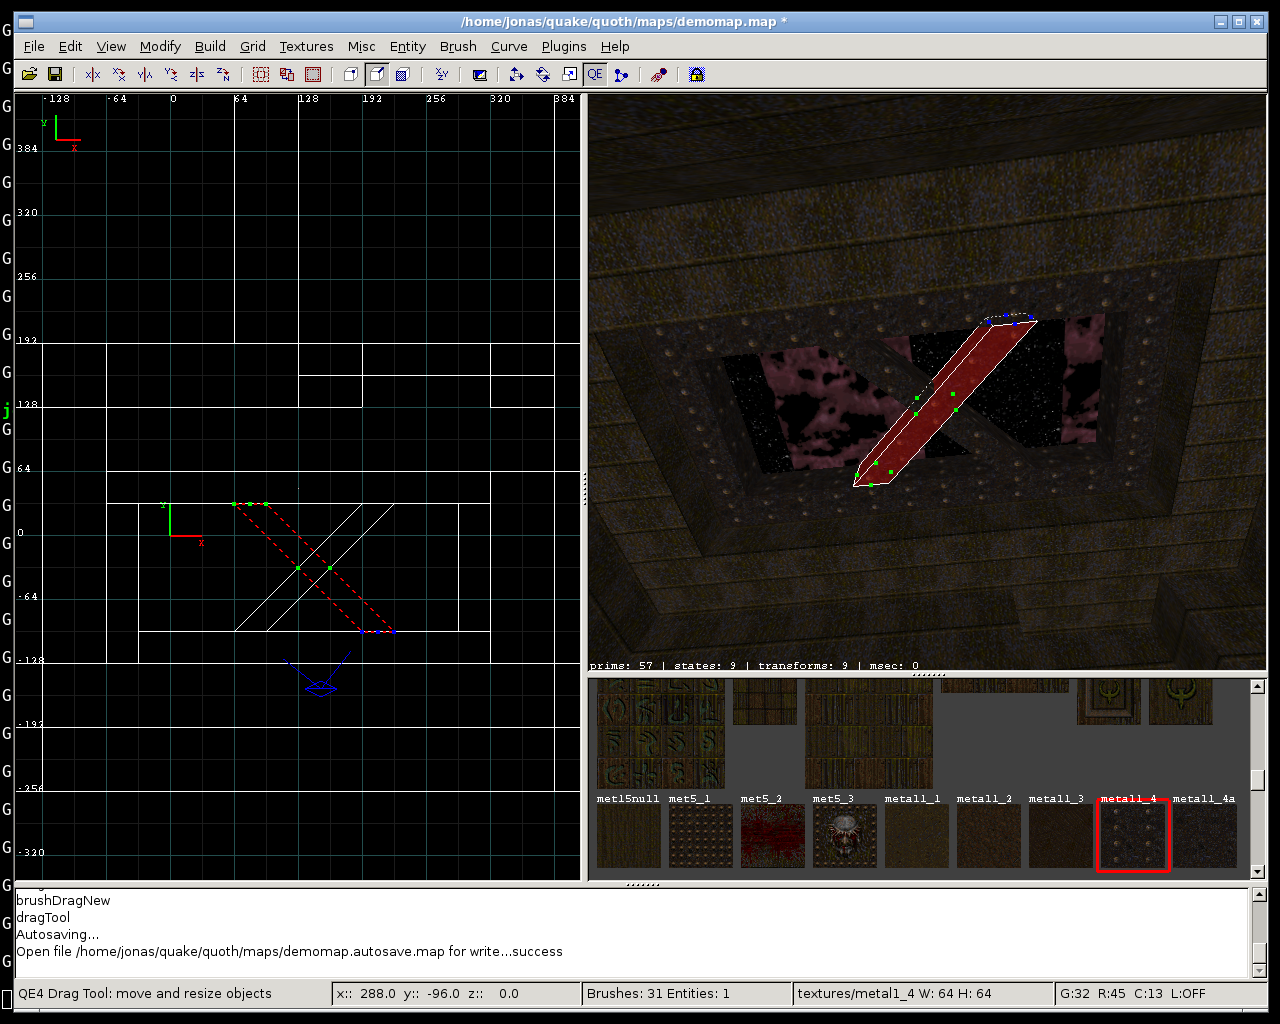
                    Now deselect that. Draw another brush just like that one, and again go to Edge mode, select one half of the brush and skew it in the other direction:


                    All in the top view, on a 32 unit grid.

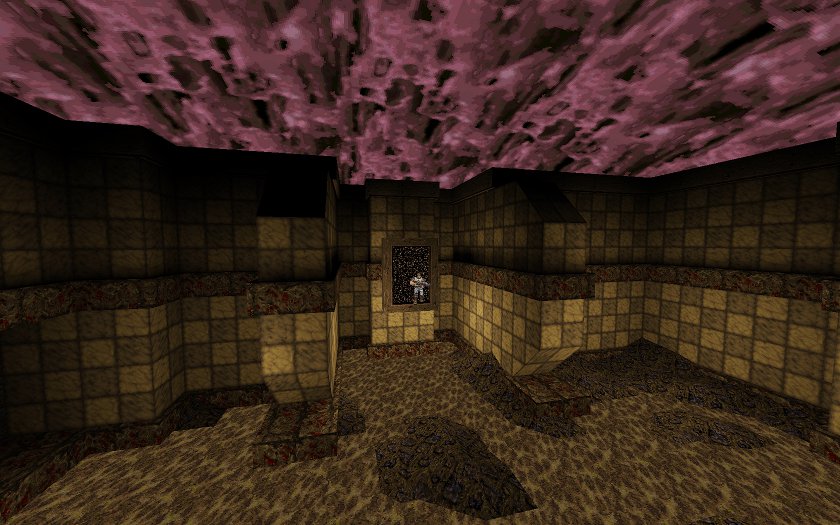
                    Good, you now have an X-shaped ornament in the sky window. You could just as well have a double X, a V, W, or any other shape of ornament. Vanilla Quake maps do this a lot. One nice effect is if you have sunlight - that's a map compiler feature - coming from the sky, it will make a nice shadow.


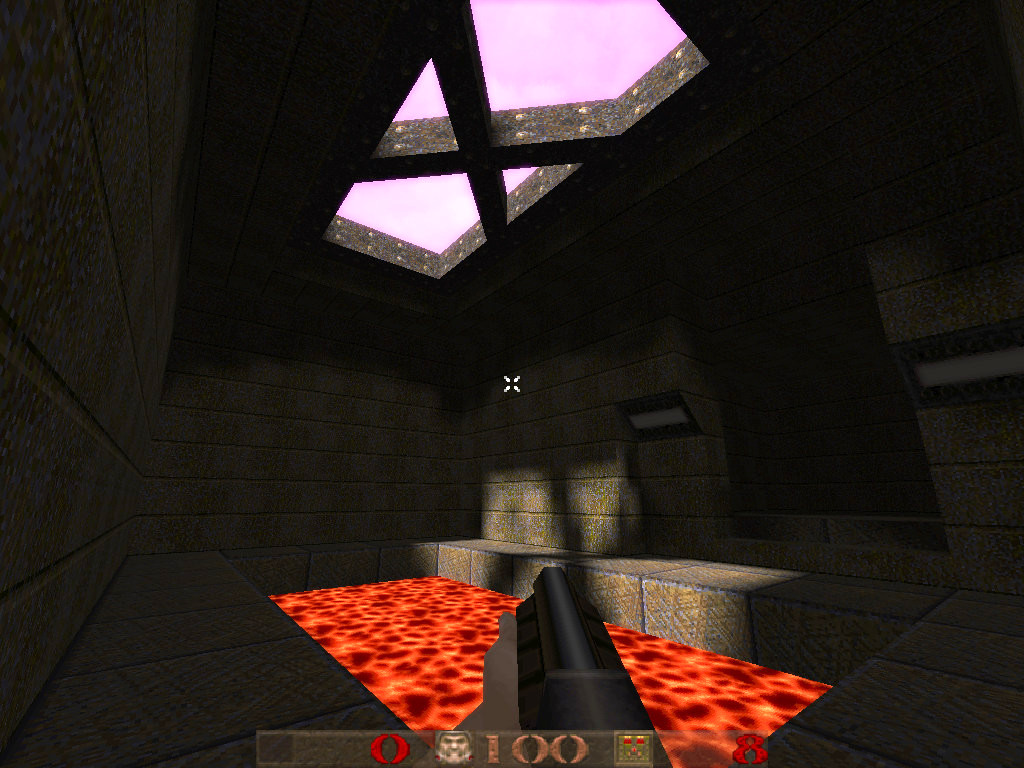
                    That's the map in Darkplaces, compiled with Bengt Jardrup's tools using the sunlight feature. I have the sunlight falling in at an angle; notice how the X's shadow is drawn on the wall. There are no other lights in the map, because we didn't place any. I made it use a pink skybox, too, which is drawn in place of the usual sky texture. Skyboxes are an engine feature; in the map editor, you just place the usual sky textured brushes.

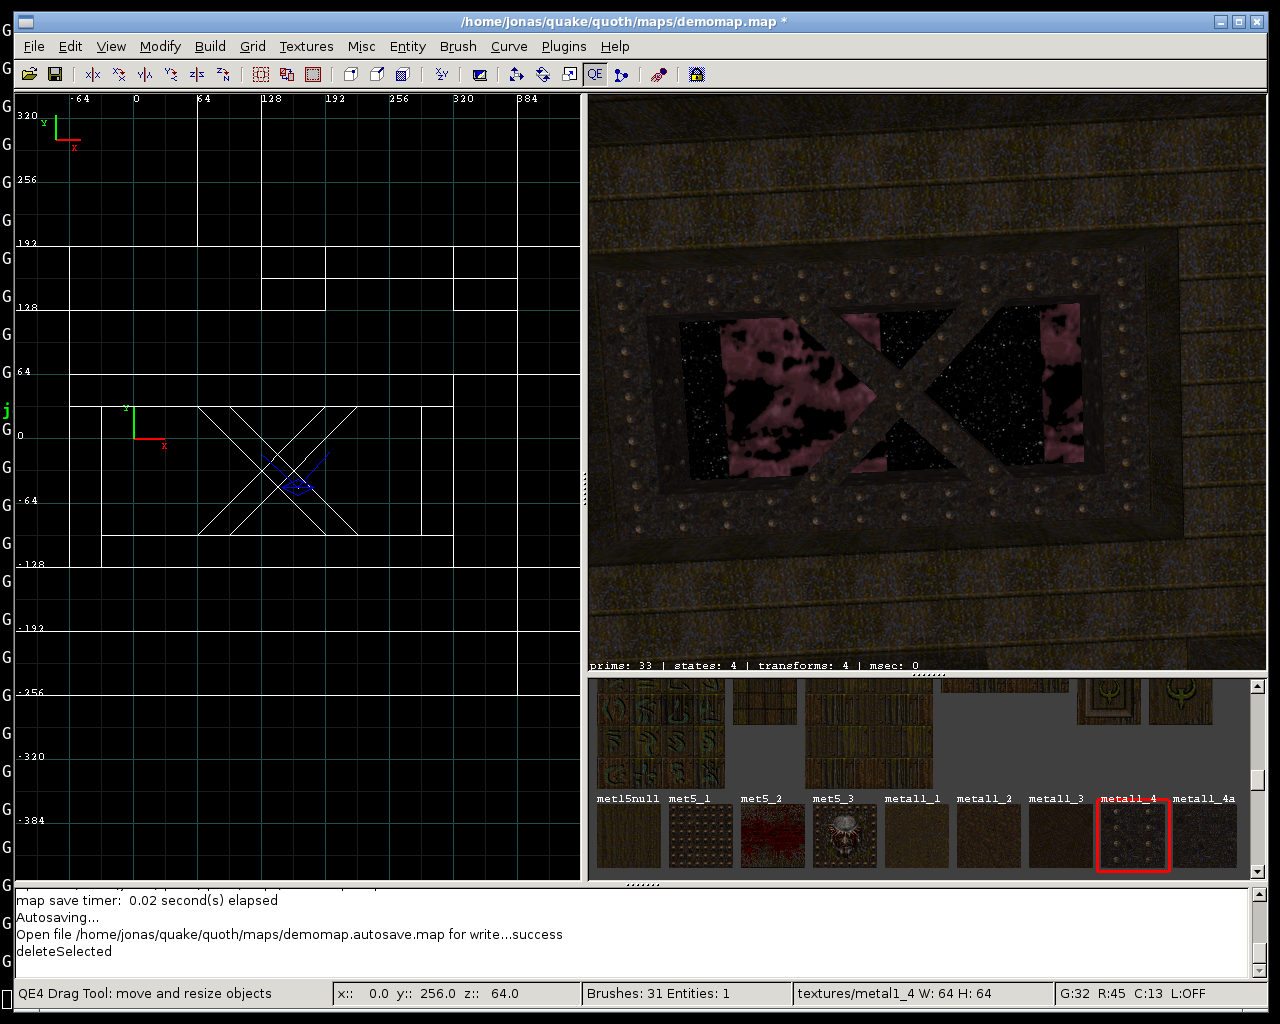
                    Anyway, that trim is nice, but some of the textures are misaligned. For example, the "X" brushes are now diagonal, but the textures aren't. Also, I want the underside to show the single row of rivets everywhere.


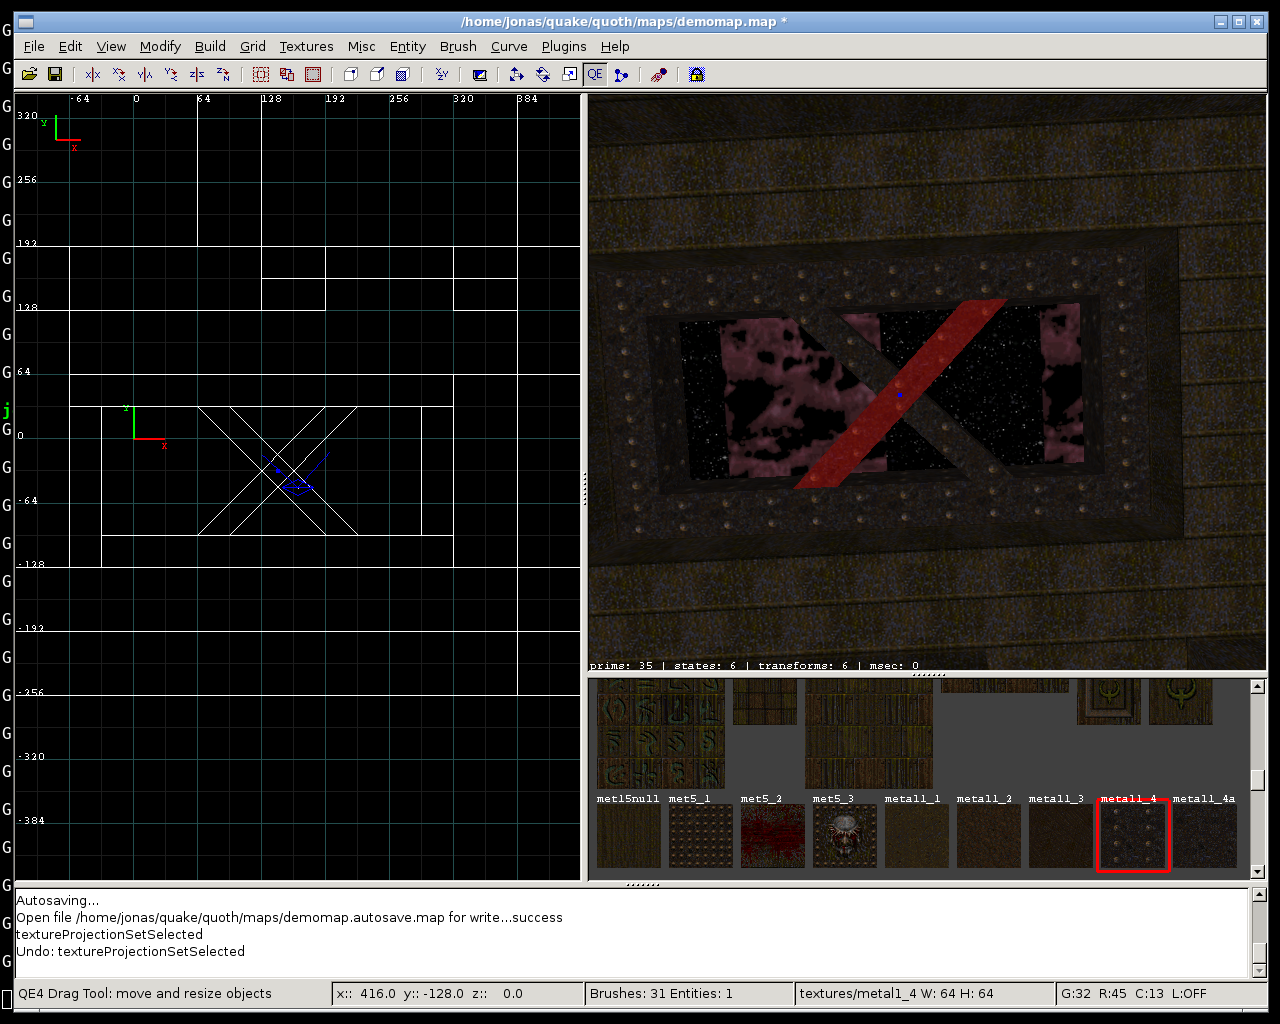
                    Select one of the faces that make up the "X" by holding down Ctrl and Shift, then clicking on it. You do this in the 3-D viewport. This way, you can select faces directly without using the Face mode.


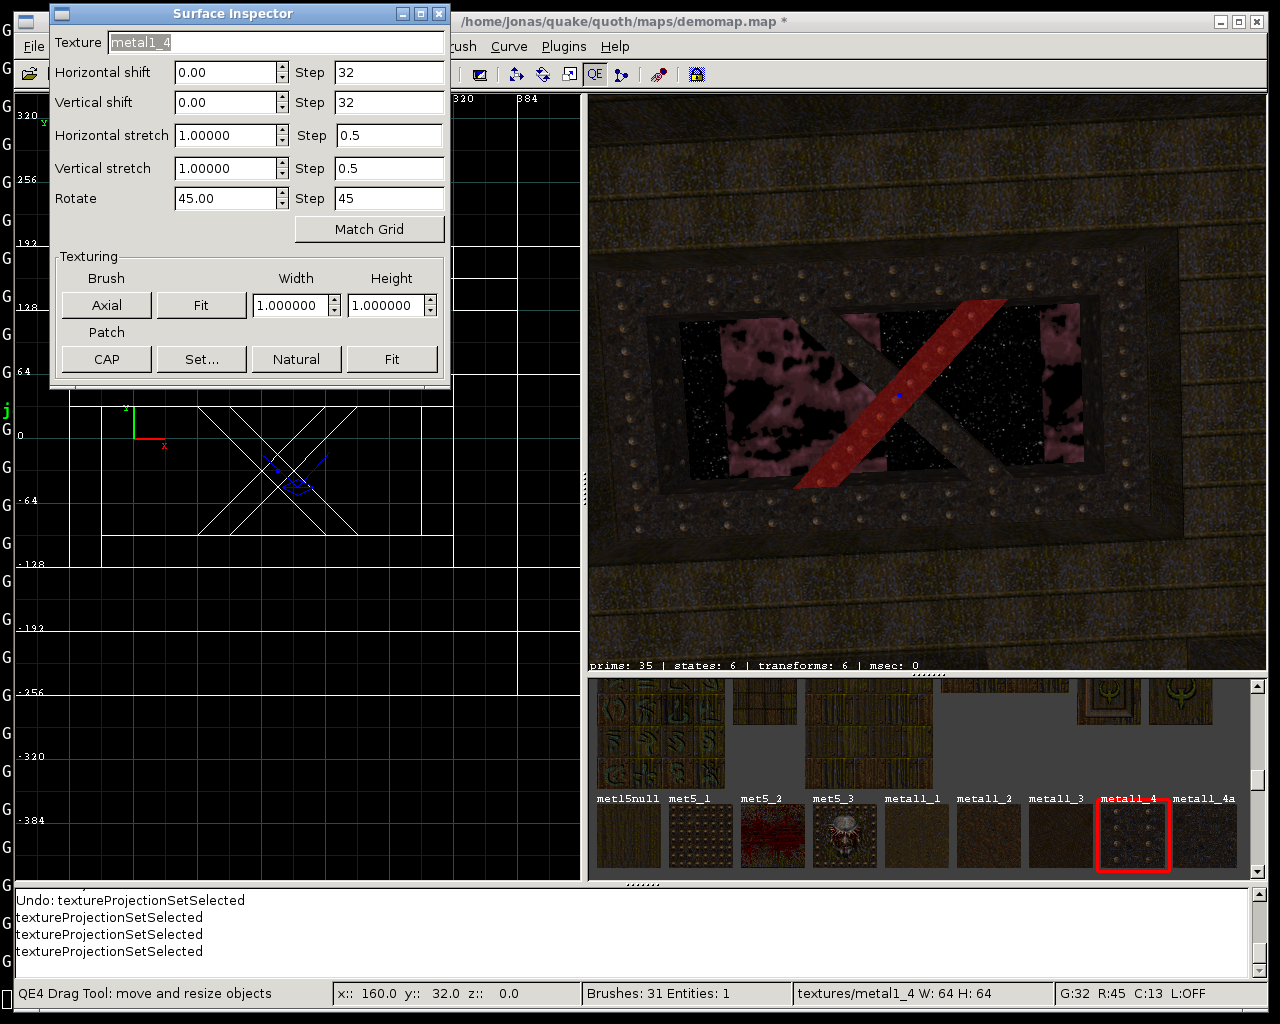
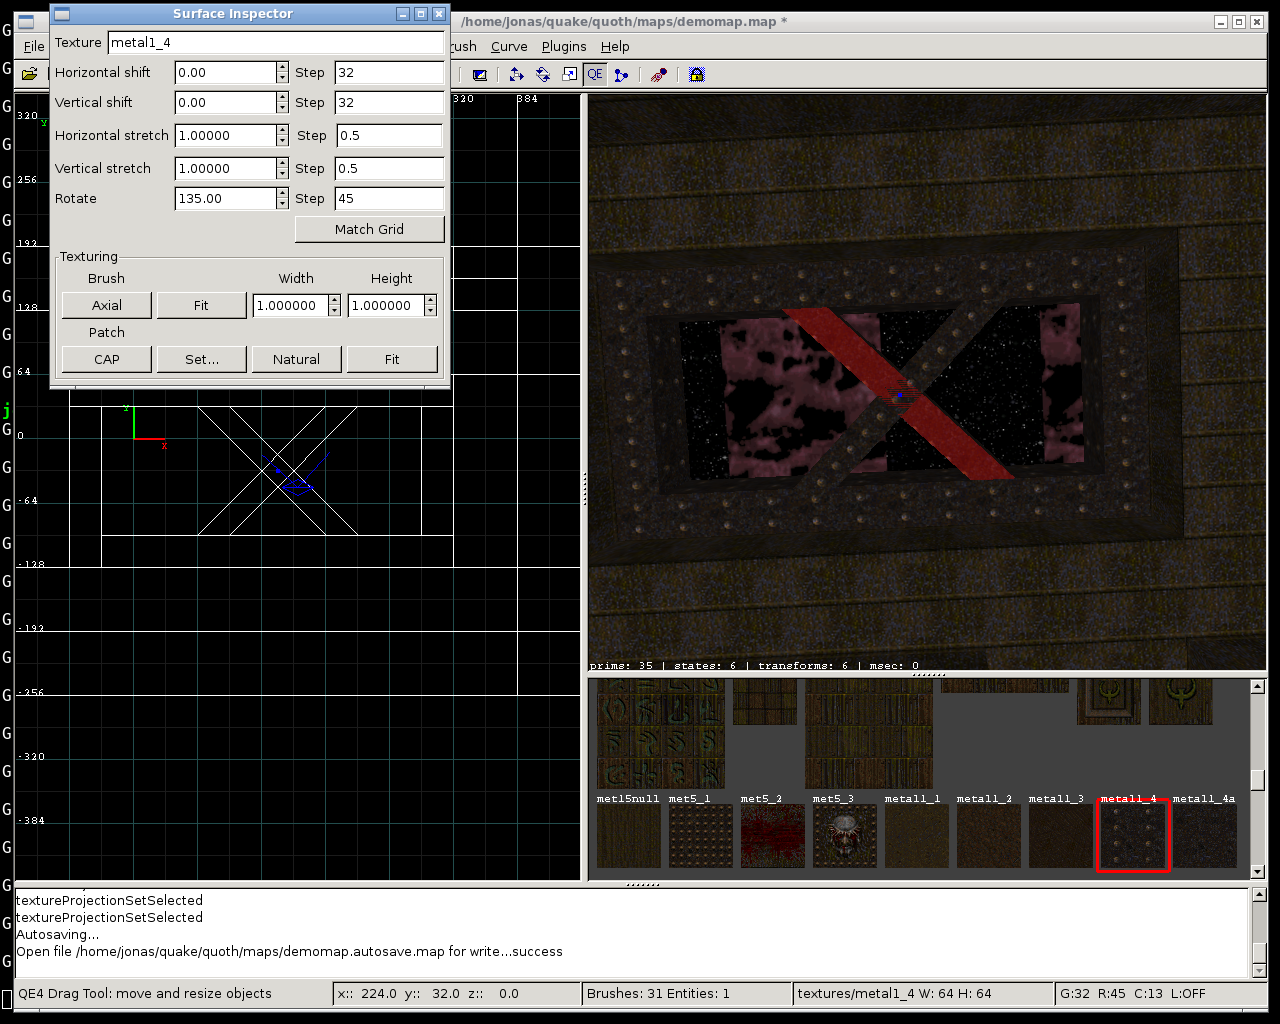
                    Press S to bring up the surface inspector. In the Rotate box, enter "45" to rotate that texture by 45 degrees. If that doesn't look right, try "135" - this rotates the texture 45 degrees in the other direction, so to speak (90 degrees for a right angle, plus 45 again = 135). You can also click those little arrows next to the Rotate box to keep rotating the texture in steps of 45 degrees.


                    In my case, 45 was the right angle - notice how the single row of rivets now follows the diagonal brush. I'm going to do the other face of the "X" now (Ctrl + Shift + Click to select a face):


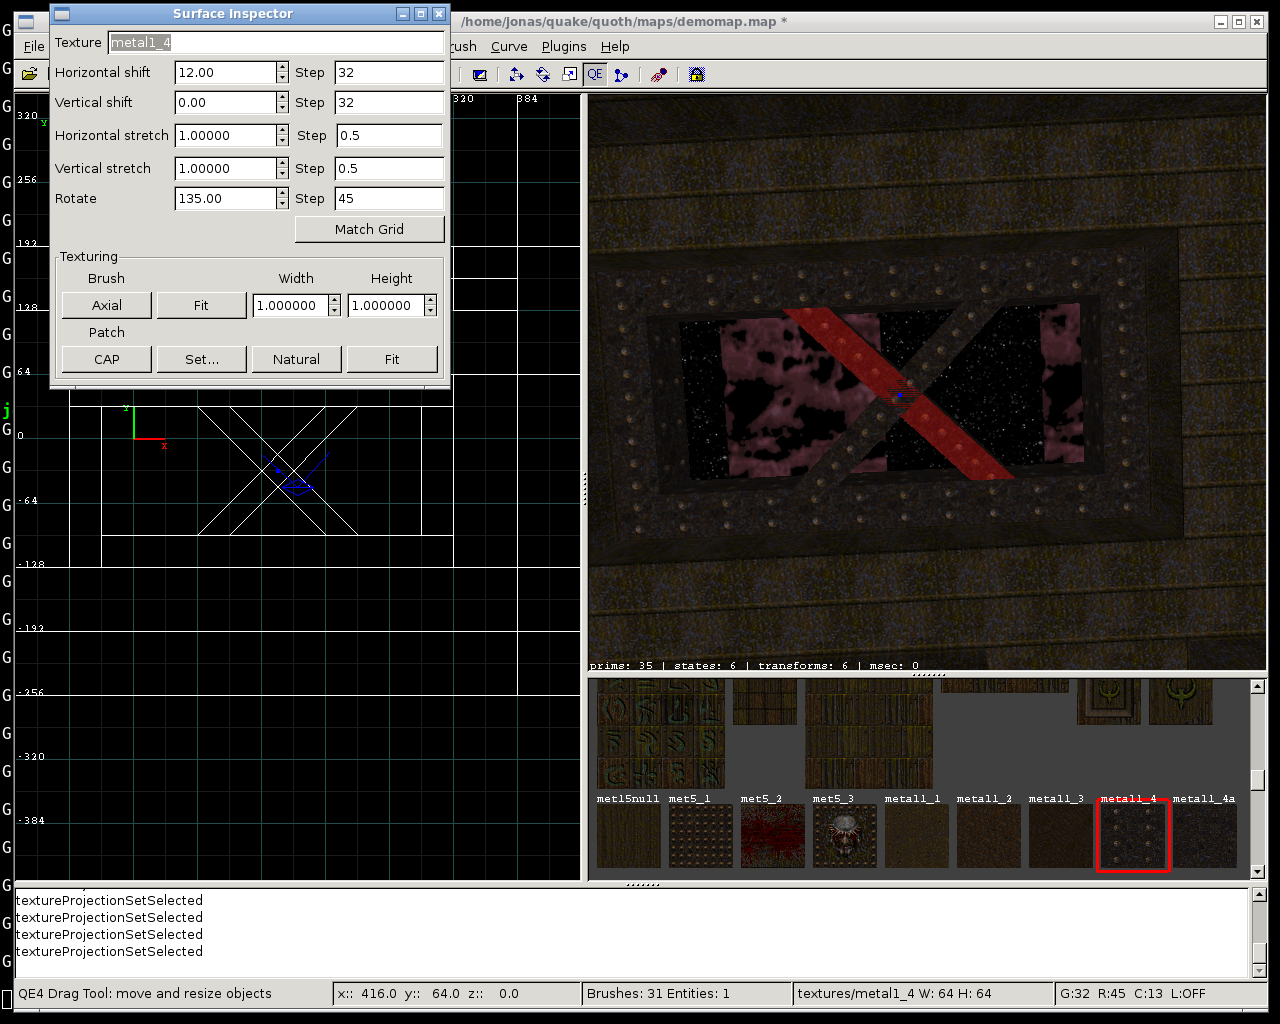
                    In this case, 135 is the correct angle; however, the rivets are cut off. Bad! I can now either try to move the X around until the rivets line up, if I'm lucky. Or I can, in addition to setting the correct angle, play around with the horizontal and vertical shift settings.


                    In my case, 12 was the magic number. I suggest trying horizontal and vertical shifts of 8, 12 and 16 units, or their multiples (48, 80...) in such a case. It's still not perfect, but for demonstration purposes, it's OK.

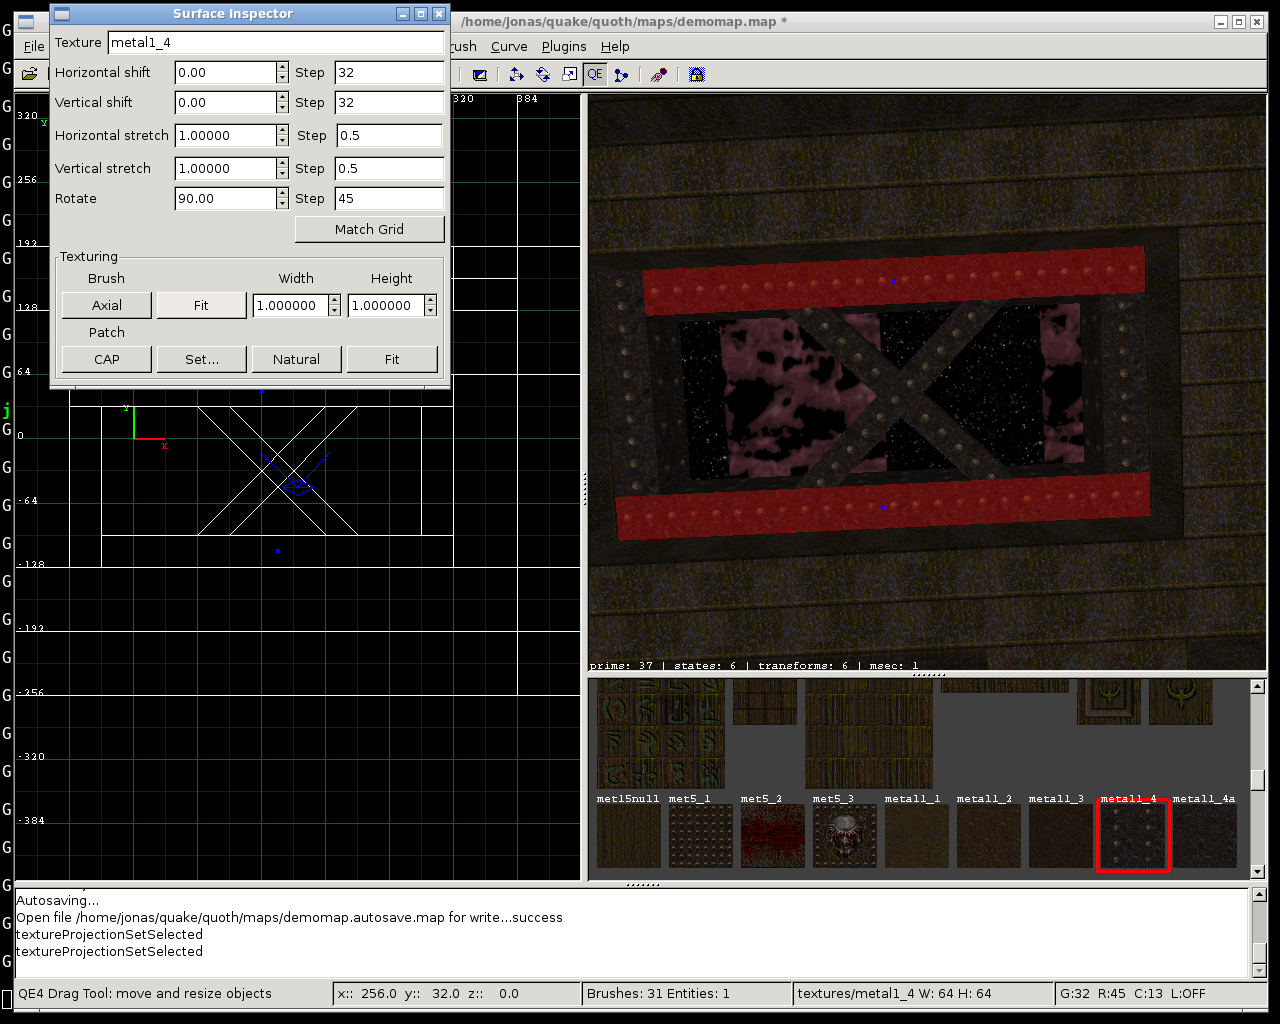
                    Now I still need to rotate the textures on the horizontal beams by 90 degrees. I select them both and rotate them at the same time:


                    Again not perfect, but all right! So much for selecting faces and aligning textures. Radiant can align textures on multiple faces, by the way, even in 3-D. You could select all faces of a brush and use the surface inspector to rotate them all around. In the same way you can select all the top faces of a set of stairs, and rotate the textures on them. And so on.

                    (Ctrl - Shift - Click) selects a face.
                    (S) brings up the surface inspector.

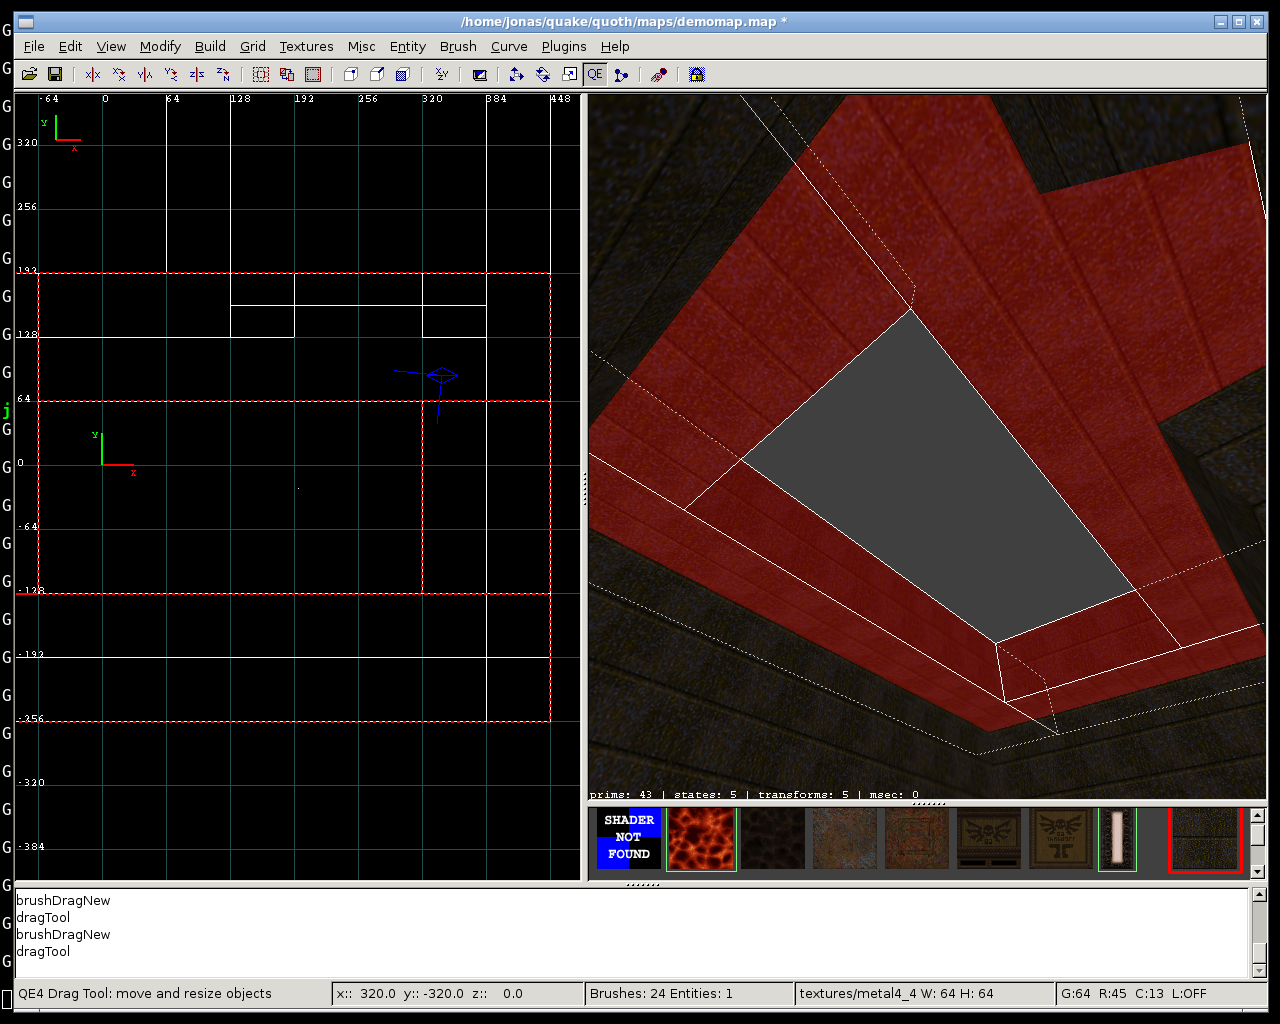
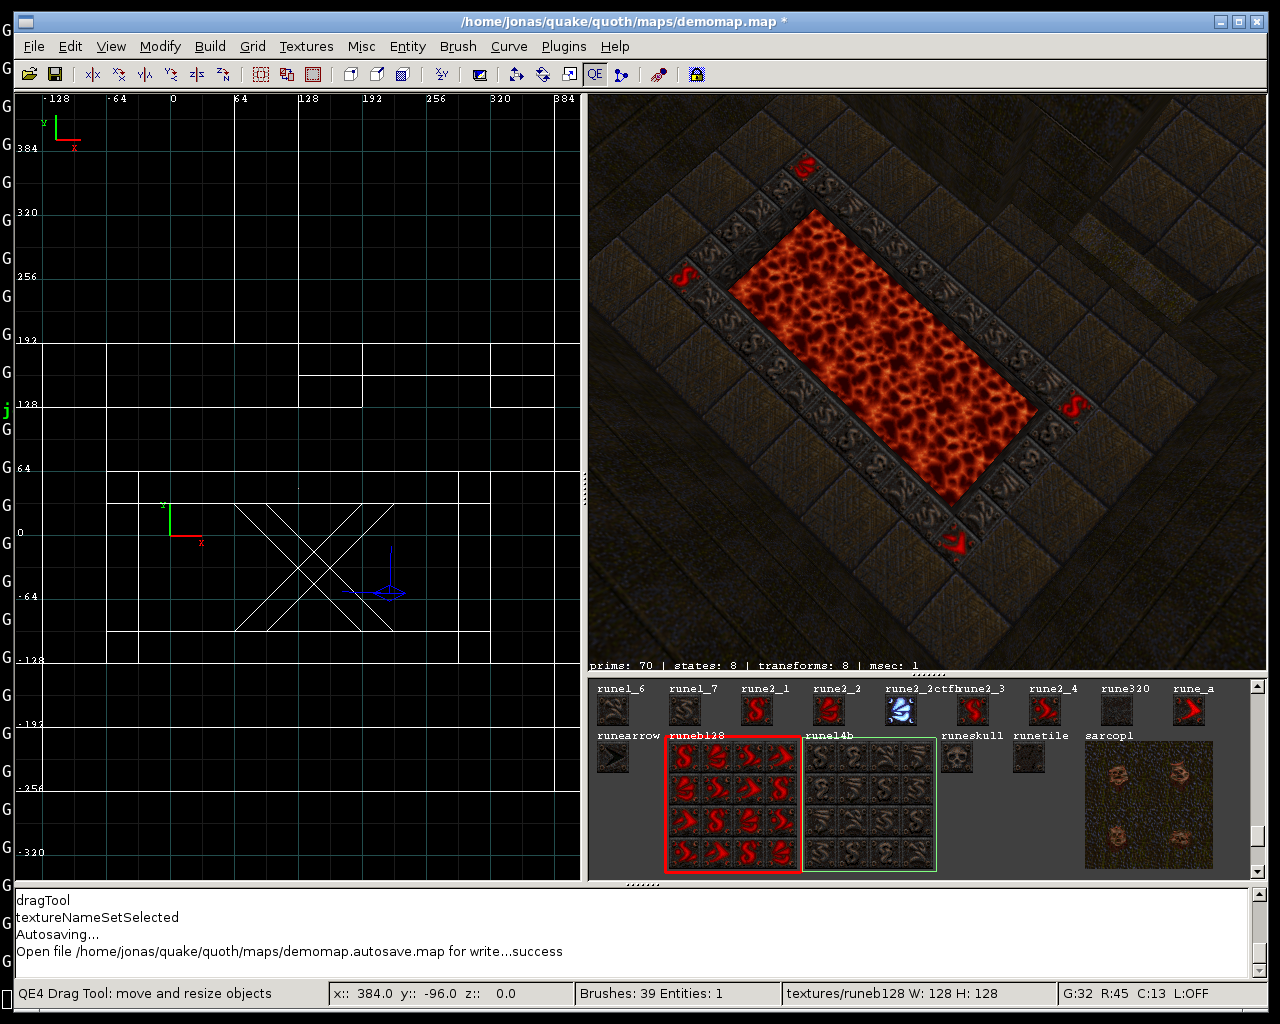
                    I'll now create a similar "frame" trim around the lava pool. In the top view, on the 32 unit grid, let's draw a frame around the lava, adjust its height in the side view, and apply one of those rune textures. The result:


                    I took the liberty to put quadratic brushes (32x32) in the corners, in order to have a red rune texture on them. Remember, anywhere you want a different texture, you'll need a brush to carry it. If you want a wall to have different textures in different parts, you'll need to slice the wall into several brushes. That's because each face can only have one texture. And to get more faces, you'll need additional brushes.

                    Here's the texture wad with those multi-rune textures. They come in very handy.

                    http://www.quaketastic.com/upload/fi...gb_tut_wad.zip

                    This concludes it for today; next time, we'll slice the walls up a bit to create more detail. And maybe we'll finally add some lights, and a player start point.
                    Last edited by golden_boy; 03-20-2010, 08:15 AM.
                    Scout's Journey
                    Rune of Earth Magic

                    Comment


                    • #11
                      As motivation this is what I made so far with tinkering today. Thanks a lot for this tutorial again. Radiant is fun and I can map very quickly with it. I dread editing a complex map though or changing big things. Quark's "groups" are super handy for that.

                      Quake 1 Singleplayer Maps and Mods

                      Comment


                      • #12
                        speedmap ?
                        What Does Not Kill You, Makes You Stronger

                        Comment


                        • #13
                          That looks cool Spirit. Nice use of that floor texture as a wall texture Quake's not empty yet.

                          Another map that used those metal floor tiles for the walls, and looked very good, was Cogs of Conflict.

                          Quaddicted.com: cogs.zip - Cogs Of Conflict by spd

                          I'll have something about making terrain here sometime.
                          Scout's Journey
                          Rune of Earth Magic

                          Comment


                          • #14
                            This tutorial will move to my blog. I tried to do something productive on this board, in this community, but too many people just come on here to talk shit. The admins aren't willing to really put a stop to the dipshitting and pisstaking and shittalking. I know for sure, because we had a long discussion about it.

                            I'm gone for a week, and all the new posts are teenage dipshits from that country over there talking shit about boners and ******s and giving head and calling each other ******s. I can't tolerate it anymore. That's not my culture. Luckily, I *have* a culture.

                            I don't belong here. I don't see a reason to write tutorials or create content for these people anymore. If you are my audience, I'd rather have no audience. If you are one of the reasonable people here, ask yourself why you tolerate that behaviour. If that is Quake, as people keep saying, then Quake is obviously lost.

                            My capacity for dealing with your hatred, bigotry, frustration, culturelessness, relentlessness, heartlessness, thoughtlessness, and so forth is simply up.

                            Scout's Journey
                            Rune of Earth Magic

                            Comment


                            • #15
                              lulz. Dude, keep writing the tuts...and just stop reading the board : )

                              or better yet.

                              Inside3d Forums :: View Forum - Mapping

                              post here.

                              er wait no... func_messageboard is more mapping oriented I think.

                              http://www.celephais.net/board/forum.php

                              post there : )
                              Gnounc's Project Graveyard Gnounc's git repo

                              Comment

                              Working...
                              X